

Kiss Me,
I'm Irish!
St. Patrick's Day is coming soon and even though I normally do not decorate for most holidays other than Christmas, I thought I would change it up this year! I made two small wreaths to hang on our sliding glass doors in our dining room. They were cheap, fast, and easy to make! (the perfect kind of craft!) Here are the materials needed:


Materials needed to create Spring (St. Patrick's Day) Wreaths:
- Split Peas (purchased from Walmart for $.79)
- Two 8 inch straw wreaths (purchased from Michaels for $.99 each with coupon,
- Two 8 inch straw wreaths (purchased from Michaels for $.99 each with coupon,
originally $1.99 each)
- Hot Glue Gun
- Hot Glue Sticks
- Elmer's Glue- Hot Glue Gun
- Hot Glue Sticks
- Paint brush
- Cookie sheet
- Foil
- Twine
This entire project cost me under $5.00 thanks to using supplies found in my home. Love when that happens! Because I am a nanny of two little girls who love to craft and watch me craft, I made a quick tutorial for your children to make a wreath of their very own :) Now your little ones can craft with you AND make the same thing as you! Fun right?!
Making Your Wreaths
1. Gather all of your supplies and prepare a clean, organized space to begin
crafting. (We all know it will not last this way BUT it's fun to start clean!)
2. After covering your cookie sheet with foil, pour your split peas into cookie
sheet.

3a. For your children, pour Elmer's glue onto paper plate with paint brush and
straw wreath close by.

3b. For yourself, grab your handy dandy hot glue gun and prepare to use a lot
of hot glue sticks ;)

4a. For your children, demonstrate how to dip the paint brush into the glue
and how to "paint" the straw wreath by smoothing out the gops of glue.

4b. For yourself, choose a small section to work on at a time. Draw lines of
hot glue to fill entire section. (I started by drawing a rectangle and then
drew lines to fill in the middle.)

Now comes the fun step for both parties! Things are about to get "cooking!"
5a. For your children, once the wreath is covered in Elmer's glue (except the
backside), have your child or children place the wreath upside down into
the cookie sheet filled with split peas. Using their hands, they can rotate
the wreath into the peas and "smush" the peas up the sides of the
wreath. (Just like Mommy when she breads chicken!) When they are
finished, they can carefully turn it over to sit and dry. Here is the final
look:

It will not be filled completely with peas and that is o k a y. It's perfect because of the hands who made it :) {reminds me of an everything bagel..yep, I'm a Jersey girl!}
5b. For yourself, once your hot glue is filling in a small section of your
wreath, hold wreath on top of peas in cookie sheet and use your hand to
cup peas on top of your wreath. Again, this will be extremely reminiscent
of breading chicken. After completing a few small sections, it will begin to
look like this:


6. Your child/children will be finished with their wreath but you still have
some work to do ;) Continue hot gluing small sections of your wreath and
covering immediately with peas. It will begin to resemble this:


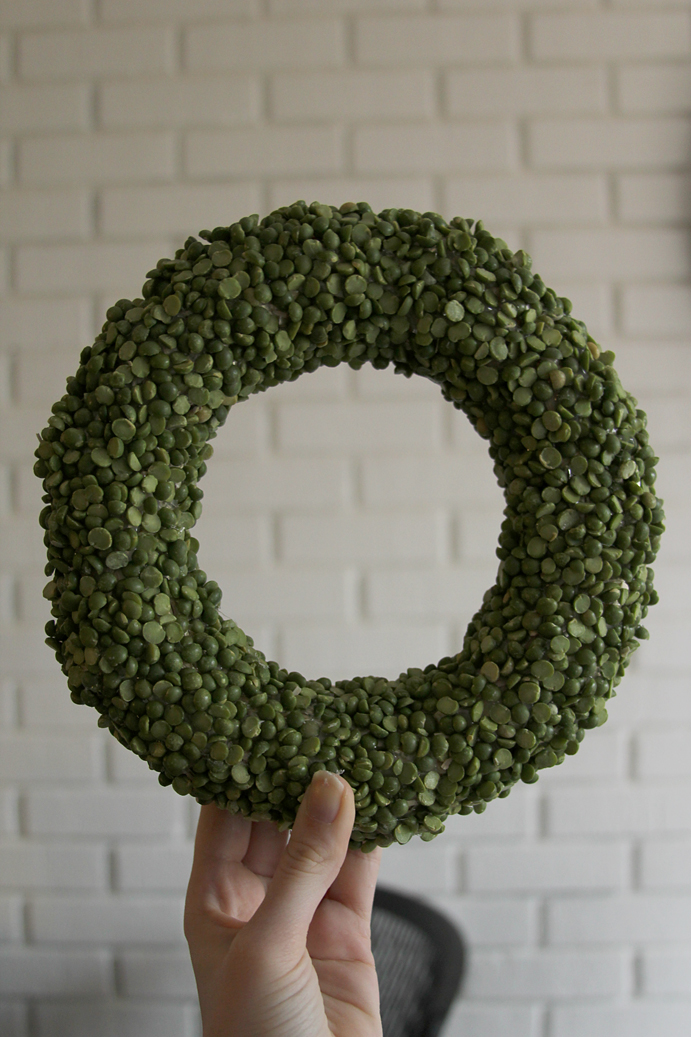
7. After about 15-20 minutes, you will be finished and left with a darling little
wreath to enjoy!

Before I ran out of daylight, I managed to snap these two shots of my wreaths hanging up! I will post of few more pics tomorrow so you can see the whole room.


Thank you for reading! I hope you and your kids will enjoy making these Spring/St. Patrick's Day Wreaths! Remember..cheap, fast, and easy to make..the perfect craft ;)
Happy St. Patrick's Day!
{Hi everyone--I am writing this little update/tip on 3/14/12 to inform everyone your spilt peas will turn brownish-yellow after about 6-8 weeks. I would recommend spraying your finished wreath with a clear gloss protective spray found at any craft store. I am not certain this will work but I am sure it will keep your spilt pea's vibrant color last longer :) Luckily this craft was cheap and for me rather simply to make so I did not mind throwing it out after two months. Good luck crafting and feel free to inform my readers how you kept your wreath green! Take care and happy crafting!}
aw so cute and pretty Katie! I sure do love wreaths ;o) I dunno why, but I never decorate for St. Patricks day. I like that your decorations look St. Patrick's Day-esq but also perfect for spring!
ReplyDeleteKatie that is so cute!!!! I might have to make littler ones next year for my classroom!
ReplyDeleteThanks Anna!
ReplyDeleteI just saw your feature over at C.R.A.F.T. :) I was so excited when I recognized it was yours, congrats!
love this ~ super cute!
ReplyDeletedo you think you could save it from year to year or would it attract bugs?? even if you can't save it, it's inexpensive enough to make every year!! great job!
Very cool idea! its fun that you were able to put this together so quickly!
ReplyDeleteI love this! So simple and great texture.
ReplyDeletei would LOVE to have this wreath in my home...but am no where nearly as crafty as you...
ReplyDeleteCute Katie! I'll have to keep this in mind for next St. Patty's day, and perhaps Emma can help Mommy out! :)
ReplyDeletewow, so pretty. You are enabling my wreath addiction. How long did this take you to make? Love the way it hangs.
ReplyDeleteladeedacreations.com
I love it!! Found you from your uplink on Tatertots and Jello. Got yourself a new follower! :o)
ReplyDeleteI was uploading my project to Get Your Craft On and spotted this wreath. LOVE it. So simple and wonderful. The color is fantastic.
ReplyDeleteThank you ladies! This project took me 40 minutes to make both wreaths. It was actually really relaxing and fun to make:)I always enjoy new followers so thank you! My follow box is kind of hidden at the very bottom of my blog. Thanks again everyone!
ReplyDeleteVery Nice. I just bought some split peas to do something wonderful with. My husband was excited cuz he thought I was going to make him split pea soup.....um no.
ReplyDeleteThose are really cute! I love the bright green of split peas! Visting from TipJunkie!
ReplyDeletexoxo,
Amy
I am split pea lover in decorating too!!! LOVE the wreath idea & so clever on filling the wreath.
ReplyDeletethat turned out so great! I've never seen that and now I think I need to try that too! Thanks for the inspiration (;
ReplyDeleteLove this! I use split peas in hurricane vases all year...love this idea!
ReplyDeleteVisiting from Tip Me Tuesday.
Amanda
this is darling. Cheers
ReplyDeleteOh, I love it!!! Thanks so much for the great tutorial! Can't wait to make one!!
ReplyDeleteReally great idea! Turned out great!
ReplyDeleteJo-Anna
That is so funny! I made split pea soup yesterday, and was thinking what a pretty, springy green the peas were! I was thinking about buying more just to fill the glass canisters in my china cabinet for a spring decoration! I guess I'm not the only one who takes time to admire peas!
ReplyDeleteThis looks fantastic! I love it. Just did a centerpiece with split peas and some other beans. Such a fun color.
ReplyDeletewww.itsybitsypaperblog.com
I love this! So creative! I have to try this out!
ReplyDeleteThis is such a cute idea! I will definitely have to try this. New follower from Bliss Images and Beyond, would love if you checked my blog out and perhaps follow back. Great job and I love that the little ones can get involved!
ReplyDeleteI absolutely love those. What a great tutorial. I also love that you included a kids tutorial :) I am now following you, and I would love a follow back!
ReplyDeletekrazycraftylady.blogspot.com
So clever! I love this idea! I'll be following your blog!
ReplyDeleteRachel @ Maybe Matilda
Very cute! What a great idea!!
ReplyDeleteAshley
www.simplydesigning.blogspot.com
Hey Katie...I love it so much. ! I've missed your posts...hope you're doing well ! xo
ReplyDeleteLu
Great idea!! Visiting from Get Your Craft On and I am a new follower!
ReplyDeleteHave a great day!
Michelle
www.delicateconstruction.blogspot.com
I love these!! I think they are just perfect for spring! And what a fun thing to do with your kids too!
ReplyDeleteThanks so much for linking up to Think Pink Sundays!
I'm new to your blog and love it! That is such a fabulous idea!!! Thanks for the inspiration.
ReplyDeleteLooks great! It seems so easy even I could probably do it :)
ReplyDelete- Katie
www.newcombhome.blogspot.com
Saw this at Blue Cricket. LOVE it. I think it is so fresh and springy.
ReplyDeleteThanks for sharing. This is definitely going on my bookmark. Now I need to peek around the rest of your blog!
Just Another Day in Paradise
Green is my favorite color, but I never really knew people used split peas for decorating until I got on the web. Love that you shared a kid and adult version. Also love the color and unexpected texture of your wreath!
ReplyDeleteI am visiting from blue cricket design link party. This is such a cute idea I love it and I like how you can use it for more than just St. Patricks day I have a green and brown room and I think this would look so pretty in there. Thank you for the idea I bookmarked it.
ReplyDeletetyandwhitneyulrich.blogspot.com
What a great idea! So creative. I'll definitely be looking at my grocery store differently today! :)
ReplyDeleteThis is such a great idea! I never would have thought of using beans! Looks great!
ReplyDeleteSo fun! Love the texture and color of these little guys!! Thanks for sharing!!
ReplyDeleteThat is awesome. I love that it's a kid's project, but it looks so professional. You should come link up with Fun for Kids Friday! www.localfunforkids.com
ReplyDeleteSuch a cute idea! I also just saw your acorn wreath....girl....you are good! I intend to do both!
ReplyDeleteThank you for sharing! Love, Me www.youaretalkingtoomuch.com
this is utterly brilliant...thanks for posting...would love for you to link this to my fridays unfolded @ http://www.stuff-and-nonsense.net/2011/03/fridays-unfolded-10.html...now following.
ReplyDeleteblessings,
alison
stuff and nonsense
Wow! I never would have considered using split peas for crafts! You rock! I am popping over from Amanda's Weekend Bloggy Reading party to say hi!
ReplyDeleteThat is so nice and unique idea. I like it alot. But I just want to know that as peas are vegetables,so will not they got rotten?? If not then I will definitely try them at home. Nice dear
ReplyDeleteI think I may be in love with this wreath. Yes. I am!!!!!!
ReplyDeleteHey Katie!! Thanks again for linking this up to Think Pink Sundays! I featured it today! http://www.flamingotoes.com/2011/03/crush-of-the-week-think-pink-features/
ReplyDeleteSuper cute. Love this idea and of course you could use other beans for other looks. Awesome.
ReplyDeleteSaw this over on Flamingo Toes today...very cute!
ReplyDeleteWhat an adorable wreath! I've been wanting some wreaths to hang on interior doors of my house and this is perfect! Thanks for sharing!
ReplyDeleteLOVE it! Found you on Today's Creative. So funny, I just posted a Spring Mantel re-do on my blog yesterday (http://juliechats.blogspot.com) featuring tons of split peas! I love it so much I put a link to your post on my FB page (Willow House Julie) if you're interested. Have a great weekend, thanks for the great, cute, cheap decorating idea!!!
ReplyDeleteKatie, { L O V E } this project, thanks for sharing!
ReplyDeletehttp://createdbykaty.blogspot.com
I love this idea & will save it for a future kids' craft (and for me, too!). The color green is fantastic & we use it throughout the house...we prob won't have to wait for the next St. Patty's Day.
ReplyDeleteBlessings,
Jen
Not sure if I have the patience for this, but I really love it.
ReplyDeleteAbsolutely love it...how are the burns on your hands after making this? I'm going to try this out!
ReplyDeleteWhat a unique idea for a wreath! I can honestly say I haven't seen anyone else with a split pea wreath, and I love it. :) It can definitely transition nicely into Spring.
ReplyDeleteThanks for joining my Weekend Bloggy Reading party. Have fun finding a new read or two, and I hope you'll visit me at Serenity Now again soon. :)
Hi, what a gorgeous wreath you made there. Just letting you know I featured your project over at www.justpleasedaspunch.blogspot.com. You are one talented lady!
ReplyDeleteOh my...that is super cute!! It is my 3 favorite things - cheap, easy, & quick! Thanks for posting it!!
ReplyDeleteThis is so cute! I happen to have a couple bags of peas because I bought some to fill a bowl I have and I guess I thought the bowl was alot bigger than it actually was!
ReplyDeleteI'd love to have you stop by my blog sometime! I came here from the tatertots and jello linky party!
I love this it is such a cute idea! I am going to make one of these soon. Love the idea, simple and inexpensive, two things I like like. Darling blog.
ReplyDeleteLindsay
Countrygirlhome
so glad you decided to link this up to fridays unfolded...can you believe i went right out and bought some split peas? haven't made the wreath yet, but you can bet i'm not saving those peas for soup...;)
ReplyDeleteblessings,
alison
stuff and nonsense
Simply FANTASTIC! LOVE it!!
ReplyDelete:D Lynda
Okay, I'm totally doing this! May I do a feature of this tute on my blog? I think it's so attainable and will get so many of us rushing out to buy split peas! It reminds me of the wreaths that Ballard had in a local show house over the holidays. It was the Southern Living Dream Home. They had three simple green wreaths on three windows above a bath tub. I looked online at the time and was shocked at the price. Now, I see this!!! Wahoo!
ReplyDeleteIt's just adorable.
I can't wait to make mine and hang them up asap!
www.thatredheadedstepchild.com
i really like this idea...have you seen the ones with acorns?
ReplyDeleteThanks for the idea, i did a bunny covered in peas for the Iron Craft challenge
ReplyDeletehttp://www.flickr.com/photos/58782363@N02/5573682983/in/pool-1525156@N25/
Love your wreath! Thanks for linking up for Friday Favorites last week! I'm featuring you for this week! Come by and grab my featured button if you'd like one.
ReplyDeleteWhat a great project - I just love any kind of wreath made with natural materials and this is so perfect for spring! Found you through Friday Favorites and will definitely be back :)
ReplyDeleteGorgeous! Would this work with a polystyrene ring? I've never seen straw wreaths in South Africa…
ReplyDeleteo.k. i did this - it took forever, but loved how it turned out - - - until the split peas started turning yellow. any ideas why this happened???
ReplyDeleteGreat spring wreath project...thanks for the update about the peas changing color. Found your wreath on pinterest. Thanks for the inspiration. :)
ReplyDeleteKarah
Mine turned out very badly. Lots of tiny holes and glue hoeing everywhere. Then I burned my hands a whole lot! It's sooooo pretty but not as easy as it looks. Or I am an idiot. I am not discounting the latter.
ReplyDeleteI love the texture of the split peas on this wreath! I featured it in a Spring Wreath Pinterest Round Up on my blog! http://www.thelovenerds.com/2013/03/spring-wreaths-weekend-pinterest-round.html
ReplyDeleteMaggie @ thelovenerds.com
I did this craft with my Daisy Girl Scouts (age 5/6). We did this as part of our Earth Day project. They loved it!! We conducted our meeting outside and as the wreaths were drying, I allowed them to canvas around and find other natural items they could glue on the wreath. The end product was beautiful. Some girls added pine cones, grass, twigs, dandelions. Each wreath was unique! Thanks so much for this idea!
ReplyDeleteralph lauren
ReplyDeleteoakley sunglasses wholesale
canada goose outlet
michael kors handbags
ugg boots cheap
christian louboutin outlet
bottes ugg pas cher
nike huarache
ugg outlet online
ray ban outlet
polo ralph lauren outlet online
cheap ray ban sunglasses
cheap ray bans
polo ralph lauren
true religion jeans outlet
lacoste shoes
ray ban sunglasses outlet
toms outlet
uggs outlet
polo ralph lauren
cheap rolex replica watches
uggs outlet
michael kors outlet store
reebok shoes
fitflops sale clearance
hermes belts
discount oakley sunglasses
michael kors outlet
uggs australia
cheap ugg sale
nmd adidas
moncler outlet
uggs outlet
rolex watches
201691yuanyuan
Hi! I’m an editor for Remodelaholic.com and am writing to request permission to use a photo from your split pea wreath tutorial, here: https://littlethingsbringsmiles.blogspot.com/2011/03/spring-wreaths.html
ReplyDeleteWe hope to feature this in an upcoming spring wreath round up. We would include a backlink and clear credit to you via the name of your blog.
Additionally, we routinely publish round-up style posts on our site and if you’re willing to allow us to use one photo from other posts you’ve done, we would love to add you to our directory of sites to feature. As a bonus, your site would then be on our radar for possible Facebook shares as well.
Please let me know if this is satisfactory. Thanks for your consideration!
Kimberly
Remodelaholic.com
carried out with twin side brushes. You mixcloud.com/ could choose whether you want it to auto Click the Following Web Page clean for everyday messes, spot Top Finest Robot Vacuum clean if it's something specifically persistent.
ReplyDeleteOur best walker for children blogrip.com/ without a doubt is the Combi All-in-One Mobile Entertainer Read More because of the selection of Best Baby Walkers in 2017 Reviews amusement showcases.
ReplyDeleteشركة نقل اثاث بالباحة
ReplyDeleteشركة مكافحة حشرات بالباحة
شركة جلي بلاط بالباحة
شركة تسليك مجاري بالباحة
كشف تسربات المياة بالباحة
شركة نظافة عامة بجازان وابوعريش وصبيا وصامطه والدرب والطوال
ReplyDeleteالتنظيف المثالي
شركة تنظيف منازل وشقق بجازان
التنظيف المثالي
شركة تنظيف فلل وبيوت بجازان
التنظيف المثالي
شركة تنظيف محلات ومطاعم بجازان
التنظيف المثالي
شركة تنظيف الخزانات جازان التنظيف المثالي
شركة تنظيف وتلميع اثاث بجازان التنظيف المثالي
شركة تنظيف عمائر وأبراج سكنية بجازان التنظيف المثالي
شركة البيت النظيف لتنظيف مدارس بجازان التنظيف المثالي
شركة تنظيف مستشفيات ومستوصفات طبية وعيادات بجازان
شركة تنظيف ستائر ومفروشات بجازان
شركة تنظيف مساجد بجازان
شركة تنظيف بلاط وسيراميك بجازان
شركة تسويق اون لاين
ReplyDeleteالتسويق الرقمي
ReplyDeleteexamresultub.com is an extensive educational portal. Students, parents,
ReplyDeleteteachers and educational institute can get Board Exam Result,
Admission, Academic Result, Career, Study Material for Assignments,
Institutes and latest Educations News in Bangladesh.
Exam Result:
BPSC is published the bcs exam result 2021 of preliminary,
written and viva exam on bpsc.gov.bd result website- https://examresulthub.com/
Bangladesh Education Board is published the hsc exam result 2021 online on examresulthub.com.
Download the full marksheet with number from here- https://examresulthub.com/hsc-result/
The Ministry of Education has published hsc admission result 2021 online for admission in higher secondary level in Bangladesh.
Full Resources:
https://examresulthub.com/sitemap/
official website:
examresulthub.com
General Science and Technology University is published the guccho university admission result on gstadmission.ac.bd. as well as examresulthub.com
ReplyDelete41st bcs exam result 2021: BCS Preliminary exam results will be published on their official website bpsc.gov.bd very soon. Candidates can exam results from their official website as well our website visit- jobnewsbd24.com.
ReplyDeleteNational University https://www.jobnewsbd24.com/103-113-200-29-student_covidinfo/ from all students protection has been published by the NU authority. students can (Covid-19) Vaccine Registration online as well our website - jobnewsbd24.com every information found.
ReplyDeleteDSHE is published the All Subject Class 10 Assignment Answer 2022 for all week on assignment.examresulthub.com.
ReplyDeleteWant to check the all assignment work and answer, make sure to follow the below subjectwise links:
DSHE is published the SSC Assignment Answer 2021 for Class 10 for three weeks. lets check the assignment work with answer.
DSHE is published the SSC Assignment Answer 2021 for all subjects in dshe.gov.bd.
ReplyDeleteYou may find other subjects assignment answer from here:
class 6 assignment answer
class 7 assignment answer
class 8 assignment answer
class 9 assignment answer
class 10 ten assignment answer
SSC Assignment 2021
SSC Assignment 2022
Inter 1st Year Assignment
use this link this post a fantastic read Valentino Dolabuy click to find out more over at this website
ReplyDeleteعروض رحلات سياحية
ReplyDeleteرحلات جماعية الى اوروبا
عروض السفر لتركيا
رحلات تايلاند
This many years later…did you ever try the clear coat to see if it reduced fading?
ReplyDeletegolden goose sale
ReplyDeletegolden goose
goyard
chrome hearts
golden goose outlet
kyrie irving shoes
off white hoodie
kyrie 6
golden goose outlet
kevin durant shoes
Thanks for the helpful info! If you're planning to use Cross Border Xpress anytime soon, don’t forget to apply a CBX Promo Code before booking. I used one last week and saved on my pass—it’s a great way to cut travel costs with just a quick code at checkout!
ReplyDeletertyv83dg3
ReplyDeletegolden goose outlet
golden goose outlet
golden goose outlet
golden goose outlet
golden goose outlet
golden goose outlet
golden goose outlet
supreme outlet
golden goose outlet
golden goose outlet