

In my spare time I find myself on a particular website just ready for my inspiration light bulb to turn on.
Any guesses what that website may be? ;)
Pinterest of course!
Back in April I spotted a pin and I had exactly two thoughts:
1. AMAZING, will definitely be making this!
and
2. DANGIT, why couldn't I have thought of this genius idea!
I have been in a bit of a creative rut lately. It's getting rather difficult to think of something completely new and original in the blogging world and the crazy awesome filled world of Pinterest. I have honestly sat just thinking of things to make, different techniques to play with and nothing--absolutely nothing!
When this happens I simply decide to try my own hand at someone else's craft because "imitation is the best form of flattery." --Truly it is my way of saying thank you to the crafter who came up with the idea and to express how much I adore their project--so much so I needed to have it in my home! So here it goes:
Thank you Kristi, from Addicted to Decorating, for coming up with this beautiful and BRILLIANT craft.
Here are my Plastic Spoon Mirrors:

Materials needed:
- Large Cardboard box
- Hot Glue Gun
- Hot Glue Sticks
- 5 Sawtooth hooks
- 5 Nails
- Hammer
- Ruler
- Scissors
- Pen or Pencil
- Duct Tape
- String
- 1 Can of Spray Primer
- 4 Cans Spray Paint
- 3 Mirrors: 2 10in Round Mirror, 1 12in Square Mirror
- 1 Rough Piece of Sandpaper and 1 Fine Piece of Sandpaper
- Optional: 4 Command Strips
- Optional: 4 Command Strips
and of course
- Plastic Spoons: 14 bags of 48 count $1.00 each
The entire project cost me around $50.00--I think that's pretty good for a set of 3 mirrors!

Making your Plastic Spoon Mirror:
1. Check your home for any materials you may already own. Then gather the rest of your supplies during one shopping trip to save yourself from having to run back and forth for more. (I took a few different trips...)
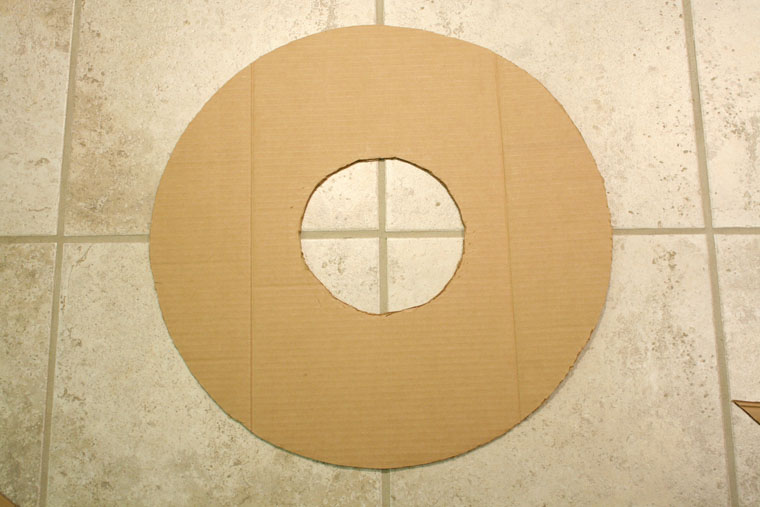
2. Cut your cardboard box so it lays flat on the ground or table.
3. Decide the diameter for your mirror using a ruler or yard stick. (I made one large, 22 inches, and two small, 13 inches.)
4. Cut a piece of string and tie one end onto the tip of your pen. Measure the string to the radius you desire and then tie the other end to your scissor.

5. Using your pen, string, and scissor you have created a drawing compass. Hold your scissor point firmly on your cardboard box and draw your circle.
Hint: Keep your pen and scissor pointing straight up and draw slowly. Also remember to keep the string taut as you are working your way around. You may even have a roommate or spouse hold your scissor in place.


6. Once your circle is drawn, simply cut it out.
Hint: If you do not own scissors sharp enough, try using a pocket knife or an x-acto blade.
7. Repeat steps 3-6 for your inner circle.
Hint: If you are creating a 22 inch large circle, draw a 12 inch inner circle, no smaller. (I made the mistake of drawing a smaller inner circle and had to change my plan once the spoons were glued. Will explain more later with photos.)
8. Using your duct tape, tape along any creases on both sides of your cardboard to add stability.
Hint: To create clean, smooth edges on your cardboard, tape around the perimeter of your outer circle and inner circle. I did not do this with my large mirror but with my two smaller mirrors and the smaller ones look polished and complete.


10. Cut the ends off of your plastic spoons.
Hint: Shop around for the most inexpensive spoons you can find--the "heavy duty" are impossible to cut through! I found bags of 48 spoons at Family Dollar for a $1.00 each.
11. Begin gluing your spoons onto your cardboard.
Hint: Practice spacing them out in alternating patterns first.


12. After 8 rows on your 22 inch cardboard circle, your spoons will appear to have run out of room.
Hint: This is what I was referring to earlier. I still had more room for spoons before reaching my inner circle but my spoons began to overlap each other and I did not like that.

So I cut my inner circle to make a larger, 12 inch circle leaving just enough room for one final row of spoons.

13. For your final inner row of spoons, cut the ends to form a nice oval shape because you will see the bottoms.
14. Use your rough sandpaper first to sand down your inner row spoons and then the finer sandpaper to smooth out your spoons. This step will take the longest but is worth the effort.
15. Glue your inner row of spoons slightly overlapping each other.
Hint: Take your time and you will be able to line them up just right!


For your two smaller mirrors, you will not run into the spoon spacing problem as I did with my 22 inch one and you will complete it so much faster! I highly suggest completing your large one first :)

16. Spend 5-10 minutes removing all of your glue gun "hairs".
Hint: Repeat this step after priming your work, the "hairs" will pop up all over!
17. Take your plastic spoon circle outside and spray with a primer made to cover plastic.
18. Once your primer is dry, spray paint the color of your choice!
(I used: Rust-Oleum Painter's Touch Multi-Purpose Spray Paint, High Gloss, Apple Red)
Hint: Double check to make sure your spray paint is meant for plastic! This spoon mirror will test your patience. It takes many many light coats to cover every nook and cranny but it's fun and shows instant results!
19. When your spoons are painted and dried, bring them inside to glue your mirrors to them.
Hint: Because of weight purposes, lay your mirror front facing you on your table. Place hot glue along the perimeter of your mirror and then place your cardboard spoon circle on top of mirror. Press firmly (and carefully) with your fingers and let sit.
20. When your mirror is in place, tape a few sections of the mirror onto the cardboard for extra security.
21. Hot glue your sawtooth hook to the back of your cardboard mirror. Again, let sit.
Hint: For my large 22 inch mirror, I used 3 sawtooth hooks and only 1 each for my smaller mirrors.

22. When everything is dry and to your liking, hang and enjoy!
Hint: I reinforced the large mirror to the wall with four command strips along with the three sawtooth hooks and nails to guarantee it would stay in place. The smaller mirrors are extremely light and did not need more help. So far so good friends!
Take a look:
Hint: I reinforced the large mirror to the wall with four command strips along with the three sawtooth hooks and nails to guarantee it would stay in place. The smaller mirrors are extremely light and did not need more help. So far so good friends!
Take a look:


Final Measurements:
My large mirror with spoons attached is 25 inches across.
My smaller mirrors with spoons attached are 16 inches across.
This project was truly fun to make and surprisingly did not take a lot of time. I suggest breaking it up into 4 days to avoid getting overwhelmed and tired of it. (I know how that happens with some projects..like this one!)
Day 1: Cut your spoons and make your cardboard circles.
Day 2: Hot glue your spoons.
Day 3: Prime and Paint.
Day 4: Attach mirrors and hooks and hang!
I know I wrote out many steps for you--some are no brainers while others have a few helpful tips. I hope you found this tutorial and project inspirational! I know I sure did thanks to Kristi's tute.
Happy Living--Happy Crafting
and remember
--Little Things Bring Smiles--
(linking to some of these awesome parties including the Pinterest Challenge hosted by these lovely ladies)
That turned out so elegant! I'm pinning this!
ReplyDeleteWOW! these are so fantastic and look like you dropped a ton of money on them at some high end store. well done katie :o)
ReplyDeleteThose are great! Anna is right, they really do look like you spent a ton of money on them! Thanks for sharing!
ReplyDeleteI have those curtains in my living room!!! I love the mirror.
ReplyDeleteThat really is awesome... and dang it why didn't I think of that! lol
ReplyDeleteHi! WOW this is AWESOME! Great job!:)
ReplyDeleteKrista @ mk inspired
They turned out soooo gorgeous! Love the red. I want to make one now!!
ReplyDeleteBTW where did you get your lighting fixture?? Love it!
DeleteHey Cassidy! Thank you so much :) We bought the fixture at Ikea a few months back when it was on sale. You can read more about it here:
Deletehttp://www.littlethingsbringsmiles.com/2012/07/new-light-fixture.html
I love the red! They definitely make an impact on that wall. :)
ReplyDeleteThese are so beautiful :) You are an inspiration
ReplyDeleteYou did great! Even though I've not been a big fan of red accents, your mirrors have got me thinking about painting stuff red!! That is a testament to your beautiful work!!!
ReplyDeleteWow those are great! Your patience paid off, they look like a million bucks!
ReplyDeleteI love how it's a fabulous accent bringing together all the other red elements in your room. Great job!!
ReplyDeleteOh my gosh, you are kidding me. Those look incredible!
ReplyDeleteThat is just stinking cool!
ReplyDeleteI adore your mirrors! I love your step by step tutorial even more! I have always wanted to do this,ever since I saw one on pinterest. Now, I know how to do it and I am so thrilled! Thank you so much for sharing the inspiration.
ReplyDeleteHave a happy weekend!
Tausha
sassystyleredesign.com
That is beautiful. I love the pop of red it brings to your walls!
ReplyDeleteWow, looks amazing. Love the three that you did together.
ReplyDeleteCan use it for Christmas too, as a wreath with some Christmas accessories added.
Great job.
These are amazing. I love the color! How long did the big one take you?
ReplyDeleteThank you!
DeleteThe big one took me two days to finish. The first night I cut out the cardboard, cut the spoons, sanded the inner row of spoons, and glued the spoons in about 3.5-4 hours. Sounds long but it was not too bad at all. The gluing was the most fun and fastest stage while the cutting and sanding of the inner rows spoons took a long time, at least a good hour. The second day I took my time spray painting it in numerous intervals. Painless day except for the hot sun and bug bites :) I am so pleased with the result I'd complete this project again in a heart beat! You should definitely try it!
Your Mirrors seriously make me GIDDY. I must make me a set. Thanks for sharing :0)
ReplyDeleteLove these and especially the red on your grey walls - such a POP!
ReplyDeleteI've seen a couple people do these, but they are the absolutely best I've seen. It is gorgeous, and you'd really never guess they were spoons.
ReplyDeleteOh my gosh these are amazing!! I LOVE the red!! They look great with the wall color. Your version is by far my favorite. I might have to try to make some small ones, they are too pretty. Pinning this! Oh and your curtains are super cute too ;) If you'd like to link up to another party, I would love to have you share this at my Throwback Thursday party! I hope to see you there and thanks so much for sharing! :) http://www.hubbymademe.com/throwback-thursday-no-4/
ReplyDeleteOh my goodness, beyond amazing! This is fantastic! I can't wait to share your link on my Facebook page--way to go.
ReplyDeletewww.itsybityspaperblog.com
I think they are very beautiful, but I am curious how in the world they are hanging on the wall without falling. I seems to me that the mirror and all the spoons would be entirely too heavy for the cardboard and hook would pull right through. Maybe I am missing something, but since it is so beautiful I would like to try it if it works.
ReplyDeleteOh Kim, you read my thoughts :)
DeleteI used three sawtooth hooks and three nails for the large mirror along with attaching 4 command sticky strips and so far so good!! The smaller ones weigh less than 2 lbs I'm sure and the larger one was heavy but surprisingly not bad at all. The cardboard and spoons weigh practically nothing, only the 12 in square mirror has actual weight to it.
I'll keep you posted--day 4 and all is well ;)
This is gorgeous and you must have a ton of patience!
ReplyDeleteAwesome craft! I am putting this on my "Craft Bucket List".
ReplyDeleteI love this mirror. Great to see another color. Looks great in a grouping of three.
ReplyDeleteThat turned out fantastic! Love it and love the color. Thank you for sharing. Visiting from Sundae Scoop. Would love it if you would share this at my Make it Pretty Monday party at The Dedicated House. http://thededicatedhouse.blogspot.com/2012/07/make-it-pretty-monday-week-8.html Hope to see you at the bash! Toodles, Kathryn @TheDedicatedHouse
ReplyDeleteSeriously? Plastic spoons! You would never know. That turned out beautiful. I love the color, too. I’d love for you to link up this (and any other ideas you’d like to share) at "One Creative Weekend" on OneCreativeMommy.com.
ReplyDeleteWow! Yours turned out great, I have to admit I've been tempted by this idea before but after seeing this tutorial I may be pushed over the edge...
ReplyDeleteI hopped over from the Sundae Scoop @onceuponasewingmachine.com
Absolutely gorgeous!
ReplyDeleteWhat a great idea! It's super cute in red! I would love for you to come link up your blog to my Get social Sunday link party!
ReplyDeletehttp://alivedinhome.blogspot.com/2012/08/get-social-sunday.html
these are absolutely gorgeous!! you really did a beautiful job and i am sooooo going to do this.
ReplyDeletedo you have somewhere you recommend for the mirrors? where do you get yours?
Hi Devon!
DeleteThank you so much :) I bought the mirrors at Michaels but I am sure they have the same size/shape ones at Joann's and Hobby Lobby. Please do this craft--it was very fun and rewarding to make! Thanks again
how long did it take to make?
DeleteI LOVE LOVE LOVE these mirrors in RED!!! I've seen the ombre version, but the red is such an awesome POP of color. It is the perfect accent for your dining room! Love it!!
ReplyDeleteI've seen these mirrors many times on Pinterest, but I think I like yours best. The red you chose is fantastic!!
ReplyDeleteJeannine @ The Concrete Cottage
I have seen this spoon mirror too, the ombre one. I sure love it in red. GORG. I love all three of yours and they really bring out the red in your curtains. Well done. winks, jen
ReplyDeleteThis is just beyond fantastic...I'm absolutely smitten with it!! I'm heading to Family Dollar in the morning...I've got to make this!! Would be super delighted for you to link up with us over at Mop It Up Mondays: http://www.ishouldbemoppingthefloor.com/2012/08/mop-it-up-mondays-28.html
ReplyDelete{HUGS},
kristi
OK that is the BEST spoon mirror I have seen anywhere, great job, I would love it if you would come and link up at my blog hop where you can list the Best of your Best, this for sure fits the bill
ReplyDeletehttp://www.missinformationblog.com/2012/08/its-best-of-your-best-blog-hop-and-win.html
Love this SO much! I love the whole room actually! I have been wanting those curtains forever but was too cheap to buy them and every time I see them in somebody else's house I regret it! Can you tell me the name of the paint color on the upper walls? It looks exactly like what I'm going for in my bedroom. Great job on the mirrors!
ReplyDeleteThank you Natalie!
DeleteThose Ikea curtains make me happy every single day. Send me an email: littlethingsbringsmiles@gmail.com-I have something you may be very interested in :) The wall color is Benjamin Moore Stonington Gray, you can see the color here:
http://www.benjaminmoore.com/en-us/paint-color/stoningtongray
Again, please send me an email! Thanks again!
Hi Katie! I sent you an email last night and just wanted to make sure you go it! And, yes, I'm back here looking at this again because I just can't get enough!
DeleteLOVE this idea! Not to distract from the beauty of the mirrors, but can I just say that your curtains are gorgeous!!! Can I ask where you got them? I love the pattern and color! Visiting from your feature on I Should Be Mopping the Floor's FB page!
ReplyDeleteThank you Sarah! :) The curtains are from Ikea, here is the link:
Deletehttp://www.ikea.com/us/en/catalog/products/90112017/
Love this! Definitely on my "things to try" list!
ReplyDelete-Erin @ DIY On the Cheap
Yeah, I agree with the other comments that these look so high-end! You'd never guess they were hand made..and from plastic spoons, no less! Great job :)
ReplyDeleteفكرة رائعة حقا ... ^^
ReplyDeleteWow - this is pretty impressive!
ReplyDeleteSo cool!! You did an amazing job!
ReplyDeleteI featured you on my blog today, feel free to come check it out:
http://www.artsyfartsymama.com/2012/08/pinteresting-features-n-shtuff-43.html
I've been seeing this around lately and am just in love - but your color totally nails this project!
ReplyDeleteAbsolutely beautiful!
I love these mirrors and definitely want to try making one, or two or three! Everyone is right - the red is perfect! I might have missed where you talk about painting the spoons, etc. but I wondered if you could buy already colored spoons instead of white ones. If not, can you tell me why before I get my supplies? I like to know why something is done, or not done ( my brain just works that way...)
ReplyDeleteThanks! Beth
Hi Beth!
DeleteThanks for the kind words :) I thought about using colored spoons but could not find a shade I liked and would match best. I also wanted a high gloss appearance on my mirrors and the colored spoons did not have enough sheen as I was wanting. The spray paint in my opinion was a smart move because it was able to cover my taping around the cardboard edges and even some of the cardboard underneath the spoons. Test out a few different techniques and use what works best for you! Hope that helps,
Katie
I cannot believe that those awesome elegant mirrors are made from plastic spoons! Well done!
ReplyDeleteGreat job!
ReplyDeleteseriously... this is the best mirror revamp i've seen to date and it looks like you spent a ridiculous amount of money on it! great job!!! you've inspired me!
ReplyDeleteOh my heck! It's fabulous!
ReplyDeletethose mirrors are beautiful!! i love the red!!
ReplyDeleteKirstie
http://hydrangealove.blogspot.com
Love these! I saw your pin on I Heart Nap Time, LOVE IT!!!!
ReplyDeleteThis is why I follow you! Love it!
ReplyDeleteWow! Pinning this!!
ReplyDeleteJust stunning - love the texture and bright red - goes so well with those curtains
ReplyDeleteIt's so great idea. Love it!
ReplyDeleteI'm still sitting here with my mouth open!!!lol..I'm in Awe!!! And thank You so much for the details on how to make something like this!!! I am the kind of person who needs to be told "how to breath" sort of speak in order to "get things"...no wonder I suck at telling and understanding jokes hahahaha...hwen and if I ever finish one of these...I was hoping for halloween...I will send you pictures and thank you again for your inspiration and wonderful tutorial!
ReplyDeleteWow, truly stunning, and looks like it was so much work! Thanks for sharing!
ReplyDeletewww.1dogwoof.com
this is incredible. you would think with those materials, that it would come out looking "redneck" but its totally looks elegant! who'da thunk?! I love it, thanks so much for the tute! I found your blog via Someday Crafts, and just became your newest follower. I would love for you to stop by my brand new blog and take a look. if you like what you see, follow me too! Thanks so much and have a good Wednesday
ReplyDeletehttp://feathersandsunshine.blogspot.com
What a bright pop of pretty! Perfect color choice. They look wonderful in your dining room. (Especially with those fun drapes.) Such a wonderful job, Katie!
ReplyDeleteHow awesome! The color is just wonderful! So bright and fun!
ReplyDeleteAnother idea take the styrofoam wreath and do the spoons this way
ReplyDeleteWow! This is truly creative and lovely. Thank you for sharing. I enjoyed my visit to your lovely blog. Hugs. P.S. I invite you to join us for tomorrows linky party ( blog hop)
ReplyDeleteSuper cute and I LOVE, LOVE the red!
ReplyDeleteKatie-
ReplyDeleteWow. Just wow. That apple red is perfect. You are first in line at the features on Creative Juice Thursday this week. I may have to copy that, in a yellow... :)
I'll also be pinning, facebooking, and tweeting this post as well. Thanks for sharing last week.
Take care,
Nicolette
Oh, my! How wonderful! -Marci
ReplyDeleteHey, there! Just want to thank you for sharing this gorgeous mirror at my Throwback Thursday party. I featured you this week! Most viewed, wahoo! I hope you'll stop by to check it out and join us again this week! http://www.hubbymademe.com/throwback-thursday-no-5/
ReplyDeleteYou did such and amazing job. I'm pinning for sure!.
ReplyDeleteRose @ http://www.arosiesweethome.com/
Oh my goodness, the red is perfect for this project! Nicely done!
ReplyDeleteYour mirrors turned out beautifully. I saw a version of this on Pinterest and thought it was so clever! Just a helpful tip for you: Next time you are using your hot glue gun, you can use a hair dryer set on high to "melt" the glue gun hairs. They basically just disappear. This can be really helpful especially if you have a project where you used a lot of hot glue! :) I love the red, by the way!
ReplyDeleteI didn't know that trick--cannot WAIT to try it, I'm sure it will save so much time, thank you Laura! :)
DeleteDon't you just love Pinterest! I saw A2D original version and your's turned out just as awesome! great job!
ReplyDelete-Jessica
www.dearemmeline.blogspot.com
I saw this on one of the blog parties as a feature and loved it, then was searching Pinterest for fall wreaths, came acroos your felt flower reath from 2010! New follower of your blog for sure, super fab ideas! If you have a sec, check out my blog too, thanks!
ReplyDelete-- Fotini { http://glamorousbride.blogspot.com }
WHOA!! These are so dang fantastic! Wow!!! I love love LOVE this!
ReplyDeleteI am in awe of your ingenuity and creativity. Absolutely brilliant and so beautiful! I wish I had one on my wall. It makes me happy just looking at it!
ReplyDeletethat's just amazing! Can't believe you've done it with plastic spoons. I'll try it myself :)
ReplyDeleteGorgeous! I love that you chose to do three and the colour is perfect for the room.
ReplyDeleteI featured you just on Thursday and I already started my own, love these!!! http://www.delicateconstruction.com/2012/08/spoon-mirrors-pinspired.html
ReplyDeleteThose are thebobmb.com! I will def be doing this for one (or two) of the rooms in my house. Thanks so much!
ReplyDeleteI love these! My mind is spinning with color options and maybe adornments! Lol! I, too, was wondering about colored spoons but I wasn't sure if it'd cause a problem in the areas that are cut and sanded.. you know, leave white spots or something then a touch-up paint may not match. Guess you'd just have to try one maybe out of leftovers. But, I like that high gloss look and you won't get that from just spoons.
ReplyDeletePeople could probably try Dollar Tree, other dollar stores, flea markets... places where the mirrors may be cheaper. But this is such an inexpensive project as is.
Let me share this, too. I have a very large family, so a few years back we started doing an Ol' Time Christmas'. Everyone had to give a handmade or homemade present like you would have received in the old days for Christmas. We excluded the children, of course. But, this is exactly something we could do for that. It was wonderful and so much fun (and FUNNY) to see what everyone came up with. Many made cookies or candy, some made ornaments, some bought various kits (which still cost a bit and kind of defeated the purpose but these were our 18-25 year olds, lol), others kind of improvised by adding to something they already had or bought and myself, took things I had put back "in case" I found a use or out of my craft storage containers that I keep full of items bought/recycled. No one got the same gift from me! Lol!
But people forget about the "It's the thought that matters" part of gift giving. Unless you just have money to throw away or just want to, why not give it a shot? Or even 'in addition to' your celebration. It's just a ball and there are so many ideasA and tutorials out there.... I'm on disability so I can assure you, I'm making as many Christmas, birthday, anniversary... gifts I can.
Okay... back to you! Lol!
Thanks so much for sharing this!
Stunning! The red looks so nice against your walls. Love your drapes too. You knocked it out the park. Great job! Bravo!
ReplyDeleteFirst of all, you did a fabulous job!! You have to link up to our Pinterest Challenge that ends tonight!
ReplyDeletehttp://www.happygoluckyblog.com/2012/08/the-pinterest-challenge.html
Also, I love the color of your walls. Do you remember the name of the color? That is the exact color I want for my bedroom.
Thanks Kara! :) The wall color is Benjamin Moore Stonington Gray: http://www.benjaminmoore.com/en-us/paint-color/stoningtongray
DeleteOk, you ROCK on the creative genius status!! Love it and I'm trying it! Michelle W
ReplyDeleteI featured your mirrors on my blog today. They are so awesome. Super, super, super, you can bet I will be making one of these.
ReplyDeleteI love these!! Great job! I also love the color of your walls - do you mind sharing the color?
ReplyDeleteThank you! Wall color is Benjamin Moore Stonington Gray: http://www.benjaminmoore.com/en-us/paint-color/stoningtongray
DeleteThis is so amazing!
ReplyDeleteWow! What a smart idea. I love it when it was painted red..
ReplyDeleteBeautiful room! I dont know if this was answered in previous posts, but where did you buy those curtains? I am havinga hard time finding a fun fabric like that- im even up for making them! love it.
ReplyDeleteSO super cute! I could never do this...way too tedious and I'm terribly DIY impaired. In fact, when I saw the first picture (before the directions) I thought "where on earth did she find RED plastic spoons?" :) It's such a great look in your dining room, though!! I LOVE it!! Good for you for actually DOING a project from Pinterest!
ReplyDeletewe have the same Ikea curtains :)....I love them! the mirrors are fab!!
ReplyDeleteHey Katie boo....it's been a while...I keep seeing this pop up EVERYWHERE ! and I keep saying ...'I knew her when...'haha.... such a great project, I'm so happy it's getting the buzz it deserves...xoxoox
ReplyDeleteLu
This is the most beautiful one I have seen. Thank you so much for the very informative directions and helpful hints!!!!!!!! Truly fabulous!!!
ReplyDeleteErin
i have tired attempting one of these a long time ago and i gave up when i was about half way through because i realized i didn't space out my first row of spoons far enough. So i was just wondering what the distance is between the spoons on the first row so i can try and attempt this again. :)
ReplyDeleteYou're the best. I have looked at this for the ump-teenth time, and each time I do, the reaction is the same. "God, that is sooooo beautiful."
ReplyDeleteI just remembered that I put a large cardboard box in the dining room to be taken out for trash. Thankfully my son is on vacation, and it is still available. So off to grab it right now because I am definitely in hot pursuit of this project, especially the large one. Thanks a million for your share.
DeleteJust Beautiful and red is my favorite color. I just may have to try this. Great Job! Love them :)
ReplyDeleteI am attempting this right now for my daughters kitchen in her first apartment. I had a really hard time finding cheap spoons. So I finally bought the premium spoons and are cutting them with pruners. Works great...almost done cutting! I hope it turns out as beautiful as yours.
ReplyDeleteThis is beautiful and so creative. Just what i need in my kitchen. Thanks for sharing.
ReplyDeleteWow! Just wow!
ReplyDeleteWhat about painting before gluing?
ReplyDeleteI did not read through all of the comments, so I dont know if anyone else has had trouble but...
ReplyDeleteI found that when i was trying to cut the spoons they kept splitting down the middle. I got so frustrated I almost changed my mind on the project. Then I had the brilliant idea of running the spoons through the bandsaw. I worked like a charm. So fast that I was able to get all the way to the point of painting in one day (well parts of one day).
I love it!!! thankyou very much for these great ideas
ReplyDeleteWow this came out so great! Glad I found your blog via Under The Table and Dreaming. I have got to try this for our kitchen, I have one bare spot that I just don't know what to do with. btw: I have a new sewing blog that I'd love for you to take a look at. I'm trying to get the word out there to fellow crafters, sewers, & bloggers! :)
ReplyDelete-Reyna
www.reynasews.blogspot.com
I loved this so much i HAD to try it! So that's what i did...bought the spoons and went on making this beautiful mirror for the playroom of my babygirl...the hints you gave were very helpfull. But knowing myself...i couldn't make it if it would take 4 days...i like instant result hihi. I did not get tired or overwelmed of the project, but maybe that's because i am a "veteran" wth DIY project ;-)
ReplyDeleteI love love LOVE how it turned out!!! Painted it turqoise, will make a hotpink one and a apple green one also...just have to watch out i don't have 'm all over my house within a year haha.
Thank you so much!!
So you see, your blogs even reach Holland ;-)
Fantastic! That is one of the best pinterest projects I've seen this season! Turned out soo good! Here's my pinterest project from this season http://www.compartmentlife.com/2012/10/pinterest-challenge-halloween-spider-eggs/
ReplyDeleteAt the Chambers Hotel in Minneapolis, they have a big wall hanging made from metal butter knives. It's funny to see how something as ordinary as silverware can be transformed into something amazing. Very cool project!
ReplyDeleteSuper cute! I have seen these on Pinterest and have been wanting to make one, just haven't had the time!! It is on my list though :) Looks great!
ReplyDeleteBest diy sunburst I have EVER seen!! Making a million.
ReplyDeleteKatie I love these. I too saw them on A2D & pinned and now that I see yours I want to do even more. I love the red too! I hope when I make mine they turn out as great as yours.
ReplyDeleteWhat is the largest possible mirror you could make? I want to make one for over my dresser
ReplyDeleteHi I love this project but I was just curious where did you get your dining room chairs?
ReplyDeleteHi, your mirror looks amazing! Very nice work!! Could you please let me know where did you get your spray primer and spray paint from? Thanks much!
ReplyDeleteKatie, your spoon mirrors look great, as does your whole dining room! I never would have guessed they were spoons :). I saw on your source list that you painted this room Benjamin Moore Stonington Gray. I'd love to feature your dining room on my paint color blog. You wouldn't have to do a thing, just let me know if you're interested!
ReplyDeleteI am thinking that if you used colored spoons in the first place you can eliminate the painting process altogether. The spoons will cost a little more but you won't need to buy paint or primer.
ReplyDeleteI'm gonna try this but I'm going to spray paint it metalic gold :)
ReplyDeleteWhere did you purchase your mirrors :)
ReplyDeleteMichaels :)
DeleteThose turned out cute!! I would like to know also where you purchased the mirrors at. I must try this for a gift or something for my house.
ReplyDeleteMirrors were purchased at Michaels :) A little pricey but they work great!
DeleteThis comment has been removed by the author.
ReplyDeleteYes I've made a sneak atoke one time out of a pen cap but I put tin foil all on the inside so if you are using any kind of plastic make sure you use foil cause plastic is very bad for you.
ReplyDeletehttp://www.dynaselimpex.com/stock/plastic-scrap/ldpe-with-pa-rolls-scrap.html
Sooo cool! Your spoon wreaths turned out fab and I love the color, looks great in your room. TF the detailed instructions. :)
ReplyDeleteThis looks great. But can't I just buy some red spoons?
ReplyDeletethose spoons that are a particular color are much more expensive than the plain white ones......
DeleteAmazingggggggggggggggggggggggggggggg
ReplyDeleteSo I am attempting to make this and not sure I am cutting the spoons in the right place. Quite a few are cracking! If I still use the cracked ones on the wreath, will the crack show when I spray paint it?? How short / long should I cut from the stem? Did anyone else have this issue??
ReplyDeleteLove the idea. Thinking of painting spoons green, eliminating mirror, and putting a nice bow on top and use as a Christmas Wreath. This is definitely going into my file for expanding ideas.
ReplyDeleteThis comment has been removed by the author.
ReplyDeleteHello! I featured your mirrors in my monthly blog series, Get Your Color On!. Each month I select a color, provide tips on how to decorate with it, and feature other bloggers with their projects that relate to this color.
ReplyDeleteThis month's post is all about red, so I featured your mirrors because I love how they give just the right amount of pop to a room. Feel free to grab a Get Your Color On! featured button and check out my post at
Get Your Color On! Red . Thanks for sharing your amazing creativity!
I just made these thanks to your well structured tutorial. Everyone loves them. Cant wait to hang them up
ReplyDeleteWell, it is a very nice post for sure, letting the people be aware about one great use of plastic spoon. People in India are highly skilled and talented for sure and they love to make craft beautiful creation from different types of raw materials, but you have used the spoons in a highly attractive way. I really loved it.
ReplyDeletewhere did you get the mirrors?
ReplyDeleteCan you give me a round about number of spoons it took to make the large mirror & the small mirror please?
ReplyDeleteThank you'
anewme1198@aol.com
Just made mine in a burnt orange... looks great! Thanks for sharing!!
ReplyDeleteplastic spoon is very harmful and very helpful for people with different kind of purpose..it is nice collections.....
ReplyDeleteplastic spoon is very harmful and very helpful for people with different kind of purpose..it is nice collections.....
ReplyDeleteThank you so very much for going through so many steps because I found this project on another site somewhere and they didn't give any steps at all. I guess they thought folks could just guess at how to make this and guess what to buy to get it done. Your pictures of each step is absolutely awesome. Thank you again for such great work. :)
ReplyDeleteI'm making the large mirror and almost done, so far over 300 spoons
ReplyDeleteI love this idea! It looks great! But I have bad luck when using spray paint. I think i would be better off just buying red spoons. =)
ReplyDeleteThat is very beautiful ! ( ' u ^) I'm sure you can skip the spray painting part completely if you just buy colored spoons. Places like Party City or OrientalTrading.com sells plastic party spoons in a rainbow of colors. I'm definitely going to have to try this one of these days. Maybe for my Mom's Birthday or maybe for my Dad's. It reminds me of a "Kiku" chrysanthemum flower which is very symbolic to the Japanese culture.
ReplyDeleteWhat size did you make the inner circle for the smaller ones? I saw you listed it out for the larger, but didn't see it for the smaller mirrors! Thanks and great work!
ReplyDeleteI bought a 5" round mirror and a box of 100 spoons. I want to make this mirror but I don't want it too big. What size is best to make a small to medium sized spoon flower using a 5" round mirror ? One craft blogger who used a 5" mirror used a 16" outer circle but that seems a little too large. I'm just looking for something small like your smaller ones you made with the 10" mirrors. Would a 10" circle be too small for a 5" mirror ?
ReplyDeleteLove the mirror, can this only be done with round mirror, or could it be done on a square one
ReplyDeleteI SO love this - i was looking for some fun projects that look more "polished" for our house. Thanks for the detailed post! - i will definitely show y'all the finished results! ( and i am so tempted to try with plastic forks!)
ReplyDeleteIt’s a classic great for me to go to this blog site, it offers helpful suggestionsphlebotomy technician program
ReplyDeleteFabulous! This looks amazing! Wondering what it would look like in gold! Looks like a very expensive mirror, would have never guessed spoons!
ReplyDeleteIf you're looking for spoons that are cheap and won't crack when cut, try the "white plastic tea spoons" by Dining Collection on Amazon. I got a box of 400 for about $8. Here's a link: http://www.amazon.com/dp/B00DQ9JQKM/ref=sr_ph?ie=UTF8&qid=1411402979&sr=1&keywords=plastic+spoons. I don't live near a Family Dollar or HEB and I had a hard time finding thin enough spoons, but these work great.
ReplyDeletewrite my essay
ReplyDeleteHi buddies, it is great written piece entirely defined, continue the good work constantly.
phone lookup service
ReplyDeleteI was searching the blogs for a long time and that is good to know that I have found such blogs here. Great working! Keep it up!
Find more info
ReplyDeleteGreat webs site with mesmerizing and unique material what else you would like.
This article has some vast and valuable information about this subject.
ReplyDeletelifestyle
Fantastic!!!!
ReplyDeleteI quoted you and this work in my blog :D
http://rava-nello.blogspot.it/2014/11/mondays-inspiration-18.html
Unbelievable work man!! Keep your heads high you probably did it.
ReplyDeleteluxury lifestyle
Thanks for sharing such a nice knowledge with us. A must read blog.
ReplyDeletecash now loans
I have actually saved your blog as a favorite; I truly love your provided information!
ReplyDeleteNewYork5StarEscorts.com
Thanks a lot brother for the bunch of useful information, I am truly impressed!!
ReplyDeletetaruhan bola online
lifestyle
ReplyDeleteI was seeking this convinced info for a long time. Thank you for offering such great information and good luck.
It is a very profitable post for me. I've enjoyed reading the post. It is very informative and useful post. I would like to visit the post once more its valuable cont
DeleteCheers! You have really allured me; I have no words to explain my feelings about your post.
ReplyDeletebest dating advice
You must know by now, your article goes to the nitty-gritty of the subject. Your clarity leaves me wanting to know more. Just so you know, i will immediately grab your feed to keep up to date with your online blog. Sounding Out thanks is simply my little
DeleteThe Texas Custom Mirrors is one of the prominent wall mirrors selling shop that creates a revolution in the decoration of house with mirrors. Are you very eager to know about this shop? Click on the webpage are given above. Especially as they sell various kinds of wall mirrors and framed mirrors for houses, bathrooms and also for offices. You can be fully determined about the superiority of the product, decoration the now a fashion, people who have had the elegant mind they must want to keep their house looking beautiful and attractive. It is very easy to do as you want to make your house as your own desire by the help of this shop.
ReplyDeleteThanks for the effort, keep up the good work Great work, the thoughts you state are truly awesome. I expect you will write several more posts.
ReplyDeletehome security systems reviews
Great! We will be connecting to this enormous post on our site. Continue the good writing.
ReplyDeleteInfographic Design
Thank you so very much for sharing such great blog! I am definitely going to bookmark this.
ReplyDeletelife & style
Thanks for sharing this useable article - I really increase your acquisition.it is really very informatic post for young people, and hope they will enjoy well after reading this post.
ReplyDeleteKLEBE BH
I'm going to make this for my house in Tampa, don't know where but I can always sell it. lol
ReplyDeleteI am satisfied that you simply shared this useful information with us.
ReplyDeleteverhuisbedrijf hilversum
I am really a great fan of your blog!! I love writing way that’s awesome. home security system
ReplyDeleteHmm you know guys I love your site and I am having a fondness for reading your blog posts daily with enjoying the mug of coffee. umra packages
ReplyDeleteHi Katie, loved this spoon mirror art. Can you please tell me what glue you have used? I am trying to make one for my house.
ReplyDeleteI m saving your blog in my personal folder to visit again You made legal points within this article that I sense need further examination. I agree with most all of this info. amazing work.
ReplyDeleteIt is a very profitable post for me. I've enjoyed reading the post. It is very informative and useful post. I would like to visit the post once more its valuable content.
ReplyDeletecomposiet keukenwerkblad
Your working is truly appreciative, it sounds good to read your blogs thanks a lot guys! High PR blog post service
ReplyDeleteYou are right about this mirror trying your patience!! LOL I did this on an old antique mirror of my grandmother's, that I had sitting around for over 40 years, but could not bear to part with. It looks awesome in my newly painted red, grey, white bedroom. thanks for the great tutorial!
ReplyDeleteI recently added your site to my top picks. I truly appreciate perusing your posts. A debt of gratitude is in order regarding your Great post and I am anticipating perused your next post.
ReplyDeleteThis blog is further than my expectations. Nice work guys!!!new york city loans
ReplyDeleteWaow man! You know you have helped several people including me, thanks for sharing with saving our never-ending hours of browsing… when to pay car deductible
ReplyDeleteThis blog post is really great; the standard stuff of the post is genuinely amazing. Atlantis Tank
ReplyDeleteGood blog, this topic is really interesting, thanks for sharing, my contribution here.
ReplyDeleteverhuisbedrijf zoetermeer
Well, I have got the best information from here the site is fully stuffed with the knowledgeable information. payday loans in tn
ReplyDeletevery nice
ReplyDeleteGreat place, great time. Getting strange experienced with orphanages. I learned how to hold an excelent progam for kids, hope more activities. I became a kid on that day in my thought.
ReplyDeletebuying diazepam online
Hi
ReplyDeleteDoes any one tried www.pharmastores.com or www.111meds.com
Any comments?
diazepam online cheap
ReplyDeleteI've found this very interesting and has a good stuff for the readers and designers. I would be glad to recommend the post for its quality content. Nice post.
I generally don’t comment in the Blogs but your blog is the only one that forced me to, amazing work... Health Insurance DeFuniak Springs Florida
ReplyDeleteThis is the happiest day of my life; I came here observed many things here that really sound good. Health Insurance Tallahassee
ReplyDeleteHmm this is one of my favorite blogs; it’s quite simple writing that can help me a lot. Health Insurance Tamarac
ReplyDelete