Showing posts with label Home Decor. Show all posts

2.08.2014

.Geometric Christmas Wreath.

I'm back with another post! 

After sharing my Christmas decorations with you yesterday (in February--I know), I was pretty surprised over a few emails I received. Well, that is if you can count 3 as a few :) Thank you for reading my posts and taking the time to write me. I will slowly be getting back to blogging and sharing my life as a new mommy with you all as well as the updates we have completed on our home. The emails asked for a tutorial on how to make the wreaths that were pictured. Unfortunately, I did not take step by step photos and was not planning on writing a full tutorial..HOWEVER..this craft was easy enough to quickly jot down the process for those special 'few' who asked! 

Geometric Christmas Wreath
I started this craft by purchasing 2, 8 inch foam wreaths from Joanns. I then chose small ornaments and glittery berries (that were part of the winter/Christmas greenery section) in varied sizes and colors of my choice. After my supplies were bought, I spread everything out at home.

Here is a photo I posted on my personal instagram:
Before I began assembling my wreaths, I used wire cutters to snip the berries off of the greenery. The glitter was a little too messy for my liking but the sizes and colors were spot on for the design I had in mind. Next, I detached the metal ornament tops. This left me with lots and lots of Christmas balls to hot glue onto the foam wreaths.

I started with the larger Christmas ornaments and actually used the shape of their top (where the metal top and hooks attach onto) by sticking them into the foam. This allowed me to arrange the ornaments before committing them into place with hot glue. Once my ornaments were laid out, I began hot gluing. I glued the Christmas ornaments first then glued the smaller berries to fill in gaps where the foam wreath was showing. 
This craft was not difficult to complete but it was time consuming. It took me 2 nights to complete the wreaths working about 2-3 hours each night. This does include breaking for snacks and a nursing session with my baby girl so the time can be cut down if you are able to work straight through.

To display the wreaths, I attached 3M hooks upside down to the backs of the white frames and hung the wreaths with red ribbon. I swapped out the art inside the frames with simple silver wrapping paper to ensure the wreaths would pop and be the focal point. 
Overall, this craft was affordable and pretty straight forward to make. I love being able to customize a craft to fit a certain room. Here is a look at the wreaths with the rest of the Christmas decorations: 
 To see more of our living room at Christmas, click here.

Thanks for reading and happy crafting!

2.07.2014

.Our House at Christmas.

Valentine's Day is almost here which means it is my last chance to FINALLY share my Christmas decor with you! 

(As I shrug my shoulders and roll my eyes..)

The goal was to have my house decorated, pictures taken, and post published before Christmas when everyone was in the festive mood..then reality hit. Life with my little babe suddenly took my "spare" time away and stole my attention and heart from other hobbies and necessary house cleaning. I found myself wanting to simply play with Penny, make her laugh, tickle her tiny feet, and hold her while she slept instead of doing anything else. I still have a desire to do other things but the truth is..

..my kid rocks!

She is so much fun right now and I am soaking her in every single day. 

Now back to the awkward Christmas in February post!

Our decorations only made it into the living room and only one Christmas craft was completed this year. You know what?--I'm actually quite proud of that small victory. Adam and I hosted my family this year and the morning before they arrived (while the house was actually clean!) I was able to snap a few pictures to capture our house at Christmas. 

Enjoy our simple, modern decor and pretend it's mid December ;) 
My sister-in-law Kim crocheted this beautiful blanket for me as my Christmas gift last year. It is as soft and warm as it is lovely! The sunburst pattern pairs well with the mirror I made a few years ago.
Pictured above are the new Christmas wreaths I crafted this year next to my felt trees from years past.

Target stopped selling these stockings so poor little Penny does not have a matching one. I'll have to find new ones for next year.
 No fuss wrapping this year, I was just thankful to get all the gifts finished in time!
 Christmas lights are pure magic.

When Adam and I lived in our rented duplex, our Christmas decorations were very rustic. Our new house is brighter and more colorful so our Christmas decor matches those fun, playful qualities. The white trees and couch pillows are from Ikea. The stockings, stocking holders, snowflake pillows, and the majority of ornaments are from Target. The felt trees and wreaths were crafted by me. The blanket was made by my sister-in-law. The deer were purchased at an antique store and spray painted white.

Thanks for reading and getting back into the holiday spirit for one very overdue post :) 
I hope everyone had a very Merry Christmas and a Happy New Year!

11.01.2012

.New Month New Chairs.

Happy November! 

This happens to be one of my favorite months for 3 reasons:

1. It's my birthday month--I'll be turning 26 on the 20th..yikes!
2. I get to share Thanksgiving with loved ones and host dinner for the very first time!
and 
3. Christmas music and decorations after turkey day!

It's been a while since I have posted any updates on our home so here are some new chairs to celebrate a new month:
Just like that little mouse who needed a glass of milk with his cookie..this homeowner needed to dress her new chair up with accessories! 

The mustard wool blanket was purchased at the Rendezvous Festival Adam and I attended with our loved ones in MN last month and the fun chevron pillow was ordered from Walmart

I'm in love:
..And the best part? 

This chair came as a package deal so I have another one! 

We purchased these chairs a month back when the price was actually much lower. I suggest you keep an eye out for better sales and extra percentages off for special days--it definitely "pays" to be patient! 

Happy November 1st everyone!

8.27.2012

.DIY Subway Art.

Happy Monday everyone! 

I am back with another DIY project for ya but this time it was completed 100% by my hubs, Adam--what a guy ;)

I have seen different subway art and typographies floating around the blog world for quite some time now and to be honest, I was not always a fan.  I did not warm up to idea of having a bold black and white piece in our home until I ordered these prints from CAPow for our gallery wall. I absolutely adore our Minnesota and New Jersey typographies (click link to view prints) they inspired me to incorporate more black and white into our house.

This led to the purchase of new decorative pillows, naturally, as well as a new piece of art. I spotted this subway art on Etsy at Vinyl Wall Decor and More and it was love at first sight..only problem--it was too small for the wall I had in mind. I was bummed out for about a minute until Adam looked at the art and said, "Give me an hour, I'm going to play around in Photoshop."

..hour goes by..

"Hey Kate, come take a look."

Voila. He did it. What a stud.
Adam saved his work to a thumb drive and we headed over to Staples to have it printed. We had it mounted on black foam core and had it laminated. The final look is exactly what I was wanting and was so pleased to have the art hanging on our wall, thanks to four 3M hooks, for $33.00 dollars within 24 hours. The final size of the piece is 18in x 24in and the font used is Novecento found from this site.

The new chevron black and white pillows were ordered from Walmart and are surprisingly very nice! I love how the black and white lead your eyes from the typography prints on our gallery wall (cannot see in photo) to the subway art in the dining room to the pillows in the living room!
Maybe one day soon, when the hubs is not so busy, I will have him write a tutorial for creating your very own subway art in photoshop-- just maybe :)

(linking to some of these great parties!)

Thanks for reading!

8.02.2012

.Plastic Spoon Mirror Tutorial.

In my spare time I find myself on a particular website just ready for my inspiration light bulb to turn on.
 Any guesses what that website may be? ;)

Pinterest of course!

Back in April I spotted a pin and I had exactly two thoughts:

1. AMAZING, will definitely be making this!
and
2. DANGIT, why couldn't I have thought of this genius idea!

I have been in a bit of a creative rut lately. It's getting rather difficult to think of something completely new and original in the blogging world and the crazy awesome filled world of Pinterest. I have honestly sat just thinking of things to make, different techniques to play with and nothing--absolutely nothing!

When this happens I simply decide to try my own hand at someone else's craft because "imitation is the best form of flattery." --Truly it is my way of saying thank you to the crafter who came up with the idea and to express how much I adore their project--so much so I needed to have it in my home! So here it goes:

Thank you Kristi, from Addicted to Decorating, for coming up with this beautiful and BRILLIANT craft. 

Here are my Plastic Spoon Mirrors:
Materials needed:

- Large Cardboard box
- Hot Glue Gun
- Hot Glue Sticks
- 5 Sawtooth hooks
- 5 Nails
- Hammer
- Ruler
- Scissors
- Pen or Pencil
- Duct Tape
- String
- 1 Can of Spray Primer
- 4 Cans Spray Paint
- 3 Mirrors: 2 10in Round Mirror, 1 12in Square Mirror
- 1 Rough Piece of Sandpaper and 1 Fine Piece of Sandpaper
- Optional: 4 Command Strips
and of course
- Plastic Spoons: 14 bags of 48 count $1.00 each

The entire project cost me around $50.00--I think that's pretty good for a set of 3 mirrors!
Making your Plastic Spoon Mirror:

1. Check your home for any materials you may already own. Then gather the rest of your supplies during one shopping trip to save yourself from having to run back and forth for more. (I took a few different trips...)

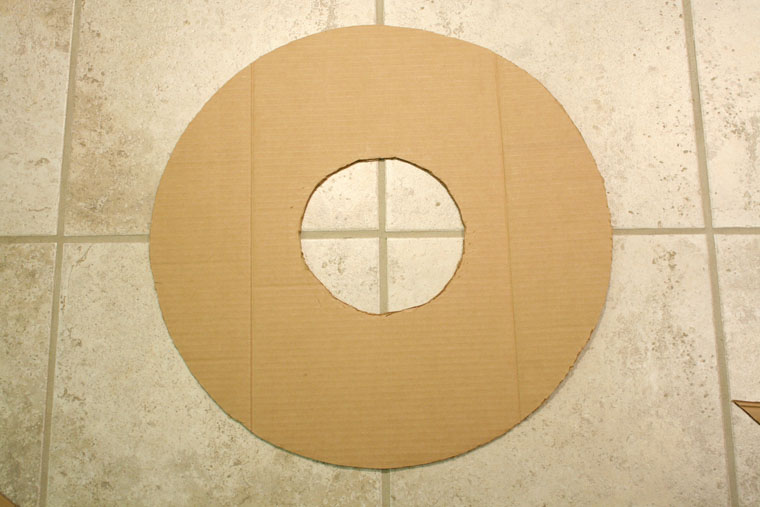
2. Cut your cardboard box so it lays flat on the ground or table. 

3. Decide the diameter for your mirror using a ruler or yard stick. (I made one large, 22 inches, and two small, 13 inches.) 

4. Cut a piece of string and tie one end onto the tip of your pen. Measure the string to the radius you desire and then tie the other end to your scissor.
5. Using your pen, string, and scissor you have created a drawing compass. Hold your scissor point firmly on your cardboard box and draw your circle. 
Hint: Keep your pen and scissor pointing straight up and draw slowly. Also remember to keep the string taut as you are working your way around. You may even have a roommate or spouse hold your scissor in place.
6. Once your circle is drawn, simply cut it out. 
Hint: If you do not own scissors sharp enough, try using a pocket knife or an x-acto blade.

7. Repeat steps 3-6 for your inner circle. 
Hint: If you are creating a 22 inch large circle, draw a 12 inch inner circle, no smaller. (I made the mistake of drawing a smaller inner circle and had to change my plan once the spoons were glued. Will explain more later with photos.)
8. Using your duct tape, tape along any creases on both sides of your cardboard to add stability.
Hint: To create clean, smooth edges on your cardboard, tape around the perimeter of your outer circle and inner circle. I did not do this with my large mirror but with my two smaller mirrors and the smaller ones look polished and complete.
 10. Cut the ends off of your plastic spoons. 
Hint: Shop around for the most inexpensive spoons you can find--the "heavy duty" are impossible to cut through! I found bags of 48 spoons at Family Dollar for a $1.00 each.

11. Begin gluing your spoons onto your cardboard. 
Hint: Practice spacing them out in alternating patterns first.
 12. After 8 rows on your 22 inch cardboard circle, your spoons will appear to have run out of room. 
Hint: This is what I was referring to earlier. I still had more room for spoons before reaching my inner circle but my spoons began to overlap each other and I did not like that. 
 So I cut my inner circle to make a larger, 12 inch circle leaving just enough room for one final row of spoons.
13. For your final inner row of spoons, cut the ends to form a nice oval shape because you will see the bottoms.

14. Use your rough sandpaper first to sand down your inner row spoons and then the finer sandpaper to smooth out your spoons. This step will take the longest but is worth the effort.

15. Glue your inner row of spoons slightly overlapping each other. 
Hint: Take your time and you will be able to line them up just right!
 For your two smaller mirrors, you will not run into the spoon spacing problem as I did with my 22 inch  one and you will complete it so much faster! I highly suggest completing your large one first :)
16. Spend 5-10 minutes removing all of your glue gun "hairs".
Hint: Repeat this step after priming your work, the "hairs" will pop up all over!

17. Take your plastic spoon circle outside and spray with a primer made to cover plastic.

18. Once your primer is dry, spray paint the color of your choice! 
(I used: Rust-Oleum Painter's Touch Multi-Purpose Spray Paint, High Gloss, Apple Red)
Hint: Double check to make sure your spray paint is meant for plastic! This spoon mirror will test your patience. It takes many many light coats to cover every nook and cranny but it's fun and shows instant results!

19. When your spoons are painted and dried, bring them inside to glue your mirrors to them.
Hint: Because of weight purposes, lay your mirror front facing you on your table. Place hot glue along the perimeter of your mirror and then place your cardboard spoon circle on top of mirror. Press firmly (and carefully) with your fingers and let sit.

20. When your mirror is in place, tape a few sections of the mirror onto the cardboard for extra security.

21. Hot glue your sawtooth hook to the back of your cardboard mirror. Again, let sit.
Hint: For my large 22 inch mirror, I used 3 sawtooth hooks and only 1 each for my smaller mirrors.
22. When everything is dry and to your liking, hang and enjoy!
Hint: I reinforced the large mirror to the wall with four command strips along with the three sawtooth hooks and nails to guarantee it would stay in place. The smaller mirrors are extremely light and did not need more help. So far so good friends!

Take a look:
 Final Measurements:

My large mirror with spoons attached is 25 inches across.
My smaller mirrors with spoons attached are 16 inches across.

This project was truly fun to make and surprisingly did not take a lot of time. I suggest breaking it up into 4 days to avoid getting overwhelmed and tired of it. (I know how that happens with some projects..like this one!)

Day 1: Cut your spoons and make your cardboard circles.
Day 2: Hot glue your spoons.
Day 3: Prime and Paint.
Day 4: Attach mirrors and hooks and hang!

I know I wrote out many steps for you--some are no brainers while others have a few helpful tips. I hope you found this tutorial and project inspirational! I know I sure did thanks to Kristi's tute.

Happy Living--Happy Crafting
and remember
--Little Things Bring Smiles--

(linking to some of these awesome parties including the Pinterest Challenge hosted by these lovely ladies)