

"I AM SO EXCITED, AND I JUST CAN'T HIDE IT!"
I have some wonderful crafty ideas for girls of all ages! Just in time for Christmas too, so grab those stockings and prepare to fill them by following this special blog post containing not one-not two-but THREE tutorials!!!
Time to create flower magic:

Materials needed for this DIY Craft:
- Headbands
- Alligator Clips
- Pins (with a flat edge on top)
- Felt
- Hot Glue
- Hot Glue Sticks
- Scissors
- Pen/Pencil
- Buttons
- Various sized circular items (I used a cd, drinking glass, a vitamin jar, and
a spice holder--look around your house for circular items to trace!)


Let the FUN begin! I originally saw how to make these flowers here, and actually created my very own wreaths! They, however, cannot be posted until after Christmas as a very special someone will be receiving them:) It is always fun to learn a new method of creating from other blogs and it's even more fun when you can put your own spin on it. I will show you all the steps and hints you need to know!
Making Your Felt Flower: Rose Style
1. Gather all of your materials and set up a nice, clean work station.
2. Pick out your first piece of felt and your circular item. (size of item is up to
you)
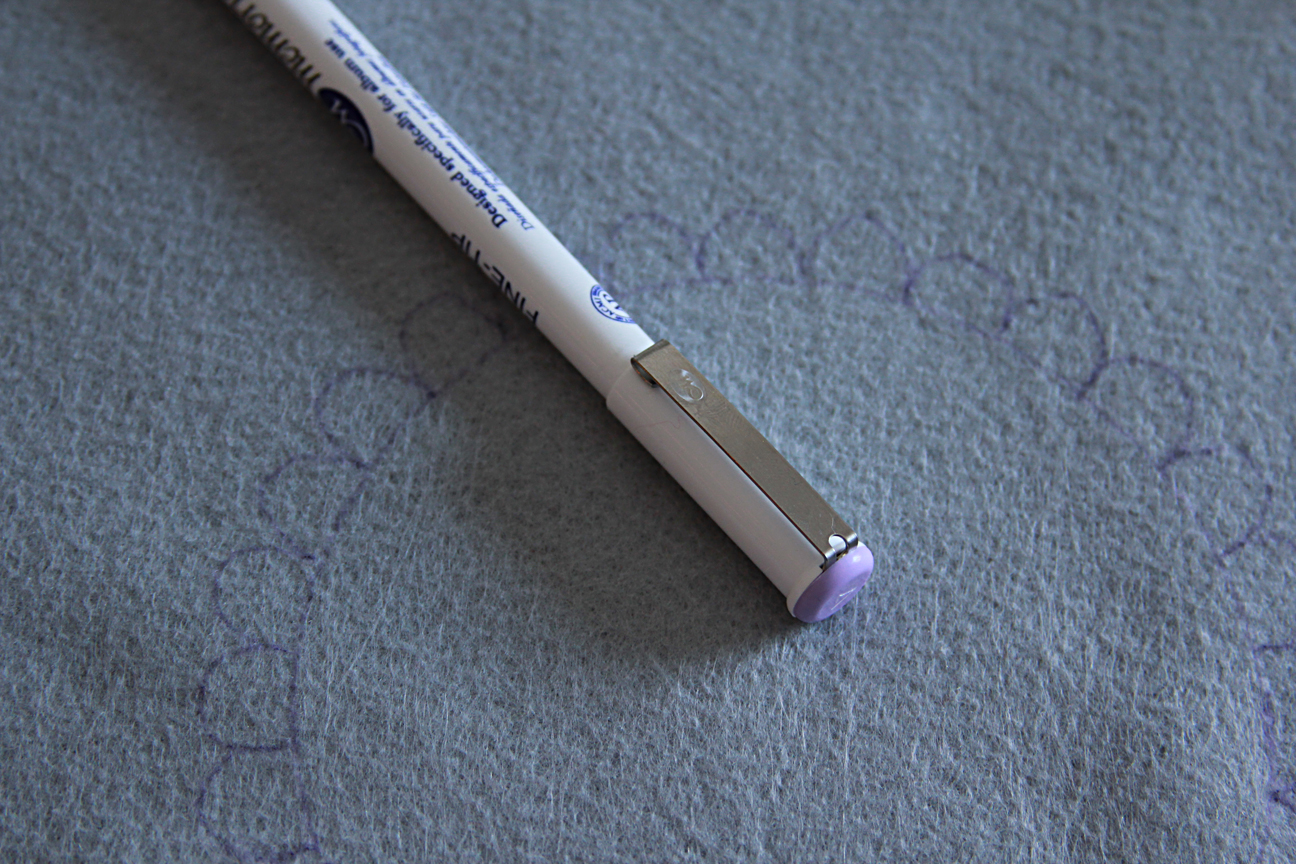
3. Trace your circular item onto your felt using a pen or a pencil.
Hint: It is a good idea to use ink of the same or
similar color as the felt so it does not show up on
your final felt flower. I used a darker ink on the
tutorial so it is easier to see :)

4. Simply cut out your circle.

5. After your circle is cut, take your scissors and cut around and around your
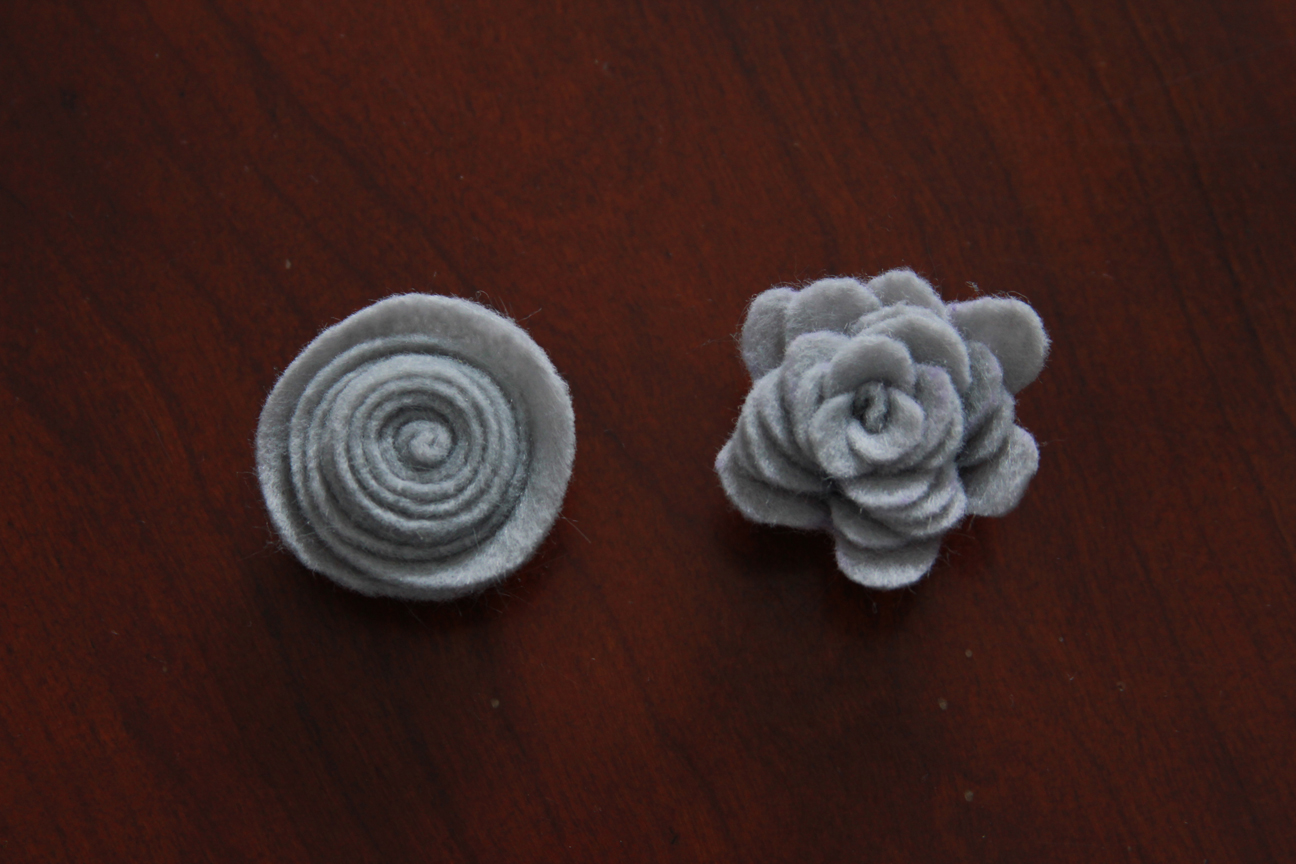
circle creating a spiral effect or a little pig's tail! It will look like this:

6A. There are now 2 ways you can create your flower. The first way is to
begin on the outer end (where you made your very first cut) and begin
rolling the felt strip keeping one side aligned throughout the rolling
process.

7. When you have finished rolling your felt spiral strip, simply add a little dab
of hot glue on the end and stick it to create your rose:

Hint: When starting to roll with the outer edge, it will
create a fuller, shorter (in height) rose.

6B. The other way of making your rose, is to begin your rolling process using
the inner end (where you made your last cut). This will create a taller,
thinner rose.

Notice the sides of this style rose do not stick out, rather they stand straight up.

It is up to you which step (6A or 6B) to use. I personally liked the way 6A appeared but it is fun to mix them up by completing both styles!
Making Your Felt Flower: Petal Style
This is the portion of the tutorial I put my own spin on this method of creating flowers. I enjoy the look of the Rose flower, but I wanted to make it look more realistic--it needed petals! After pondering for a few minutes, I found a solution!
Steps 1-3 are same as above tutorial.
4. When your circle is traced completely, take your pen or pencil and draw
petals around your circle using the edge you drew a guide.
5. After your petals are drawn, begin cutting! This part is a bit tedious but the
slower you go, the better it looks :)

6. Using your scissors, cut around your circle creating a spiral (or like I said
earlier, a little pig's tail.)
7. I chose to use method 6A from above to roll my flower with petals.


8. Continue rolling until there are no longer any petals on your felt spiral
strip.

9. Simply snip off the extra felt and place it aside. Hot glue your end onto the
body of the flower.

10. With the leftover felt spiral strip, simply roll it up and hot glue your end
to create a rose! It's magic--two felt flowers from one felt circle.
Two completely different looks! Both equally fabulous ;)

Hint: Your Felt Flowers with Petals can appear two
different ways, just like your Rose flowers. Using
step 6A from the Rose tutorial, it will appear like
so:

Hint: Using step 6B from the Rose flower tutorial, it
will appear like this:

It will resemble a star formation and will be taller and thinner.
Are you ready for even more options? ;)
Following the Felt Flower with Petals tutorial, instead of drawing and cutting rounded petals, change it up--draw little triangles to create this look:


Enjoy your beautiful Felt Flowers!

Now that your have your flowers made--GET CREATIVE! I decided to hot glue my flowers onto Alligator Clips:

And Pins (with a flat edge):

We are not finished yet! If you are still reading this post, I thank you. It is long, but I hope you are being motivated by these different varieties of felt flowers! Here is the last type of Felt Flower:
Making Your Felt Flower: Flat and Layered Style
Steps 1-5 are the same as above tutorial.
6. Continue using steps 1-5 to create numerous flowers. Feel free to use all
the same color felt or different colors.
Hint: Use different sized circular items to create a
small, medium, and large flower.

7. After your flowers are cut out, simply hot glue the three layers together.
8. Add a button in the middle and your flower is complete:

Another finished flat and layered flower:

Hint: Instead of using a button, I made a mini Rose
and hot glued it in the center! This is my favorite
look :)

9. Hot glue your flower onto headbands, great for girls of ALL ages!


Hot glue them onto..
- Alligator Clips/other hair clips
- Pins to create a beautiful broach for your shirt, jacket, or hat!
- A headband
- A picture frame
- Decorative pillows
- Bags, purses, sacks, pocketbooks, backpacks--whatever you choose to
call them :)
- Wreath made out of twigs (I did this and it turned out great, pictures
coming AFTER Christmas)
If you can think it, you can do it! How would you use these felt flowers?
I just made one of these last night. Another idea I had for them would be for decor. You could sue a foam cone (like from your almond tree) and attach them to that, all over. It would be very pretty in red or pink!
ReplyDeleteGreat idea Annie, I may just try it! Thanks for reading :)
ReplyDeleteSo, so cute katie!
ReplyDeleteps You know those wreaths you made with the little girls you nanny? After seeing them on your blog I decided we must make some in my class. We made them yesterday, they turned out great. Thanks for the ideas!
Anna that is awesome! This craft is perfect for your little ones, I hope they enjoyed it! And I think the credit needs to go to my first grade teacher :)
ReplyDeleteOH MY WORD! i am so not crafty, but my daughter aspen would LOVE these...may have to see if i could attempt this one! simply adorable!
ReplyDeletesoooo adorable!! I have to find time to do this! Been wanting to make some felt crafts!
ReplyDeleteThese are so great! And wow, you have such patience to actually get them finished! :)
ReplyDeleteThe next time Brent and I are in Lynchburg, can I come over for craft time with Katie? hehe. So cute!!!
ReplyDeleteThis comment has been removed by the author.
ReplyDeleteOK - I got to see you make some of these things - very cool! I am just so impressed with the directions & the photos - it's like we are looking at a magazine & reading the craft section. Very well done - both the crafts & this blog! I am impressed!
ReplyDeleteKatie! I have always loved following blogs on babies, families, and food, but you now have me hooked on following crafters like yourself! I've been wanting to add a few decorative touches around the house and am thinking of making a topiary using these roses. I'll let you know how it turns out (fingers crossed)!
ReplyDeleteYour camera is amaaazing! And I loved making these, especially with you. Sooo creative!
ReplyDeleteMuch love.
Kayla.
Cute flowers... I love making the Rose, Petal and Pinking Shear style too...
ReplyDeletewhat kind of camera do you use?
ReplyDeleteKendra- I used my husbands Cannon T2i..it's his work camera. He uses it to shoot amazing video!! Lucky for me, it also takes really awesome photos :)
ReplyDeletesuper nice tutorials..i just love these..awesome
ReplyDeleteThese flowers are fantastic! I love every single look, particularly the last one with the little rose in the middle.
ReplyDeleteHow about making a bunch of flowers and sticking them onto bamboo skewers to make a bouquet?
You can check out my post for a similar result http://merrymakes.blogspot.com/2010/11/stem-roses-from-broken-kites.html
Love the different styles! Thanks for sharing.
ReplyDeleteThese are really cute! I've made the simple ones before, but never added an edge. I like those a lot.
ReplyDeleteWOW!! What a great tutorial! THANKS!! I need this. I got the fabric one's down. I'm the MASTER at the paper one's but I've needed some help with the felt flowers! :) I'm your newest follower too!
ReplyDeleteI LOVE felt flowers!!!! And your designs are SO cute!
ReplyDeleteThanks for sharing!
Great tutorial - I love those rolled flowers in papre and I never thought of using felt! Will definitly be trying this out!
ReplyDeleteLowri
Thank you SO much for this lovely, easy to follow tutorial. I was hoping to find something to do today - that was a bit different for my young children - & I did. x Katie x
ReplyDeletethese are all so cute!!!! i love them :)
ReplyDeleteSo cute! I'll have to branch out from fabric flowers!! Thanks for the inspiration!
ReplyDelete(found you on the Whipperberry linky today!)
LOVING the headbands! :) Great tutorials...the layered ones are so pretty. :)
ReplyDeleteThank you so much for joining my Weekend Bloggy Reading party. :) Have fun finding a new blog friend or two, and I hope you'll visit me at Serenity Now again soon! :)
These are adorable! I have made the simple rosettes and put them on a tree skirt but I love the other ones as well! Filing this project away!
ReplyDeleteHands down the best tute on flowers EVER.
ReplyDeleteThanks for linking to Creative Juice Thursday! I hope to see you back this week {party opens on Wed night @ 8pm CST}
Thanks for the tutorial. I just it to make a fall wreath :)
ReplyDeletehttp://www.thegrantlife.com/2011/09/hello-fall.html
This post is fabulousness! I am bookmarking it now for all my future DIY flower needs. :)
ReplyDeleteI LOVE this! I have 4 daughters and to make these would be wonderful. Also gonna try your wreaths with different colors for different times of the year!
ReplyDeleteI have just happened upon your blog and love this tutorial. Thank you for sharing in such detail..will definitely be trying these!
ReplyDeleteThank you, thank you, thank you! I found this through Pinterest, and I'm so excited to try these out. I've been searching for a good tutorial on how to make those cute spiral flowers, and your's is the first that actually made sense! I can't wait to make them for my Fall wreath!
ReplyDeleteLove this tutorial! Shared it on my website! Thanks for being crafty and sharing! ~Dee
ReplyDeleteFound you on Pinterest. I made a few of these.. they are so cute and so easy! Thanks!!!
ReplyDeleteSo cute! I can't wait to try these.
ReplyDeleteGorgeous flowers! Great tutorial!
ReplyDeleteI just found your blog. Thanks for the great tutorial!!
ReplyDeleteThanks for the awesome tutorial. (I found this on Pinterest!) I used the felt flowers on a fabric wreath: http://christenheartspinterest.wordpress.com/2011/11/28/fabric-wreath-with-felt-flowers/
ReplyDelete~Christen
Thanks for the tutorial. It's the best I've seen anywhere! My daughter loves felt hair clips and this just doubled all I can make for her! Thanks :)
ReplyDeleteThanks! I make the simple rosettes, but love adding the petals! When I make them though, instead of starting with a perfect circle, I cut out a square and just round out the edges, it creates a different kind of petal.
ReplyDeletebellissimi!!!!!!!:-)
ReplyDeleteGreat tutorials! I found you through Pinterest and it was just what I needed for a project I'm working on.
ReplyDeleteExcellent tutorial. Thank you!
ReplyDeleteYour instructions and photos are some of the best I've seen - excellent work and very lovely results! Thank you for sharing.
ReplyDeleteThis comment has been removed by the author.
ReplyDeleteOops, I think I deleted my post where I said thank you for sharing your idea and for explaining the directions so completely:)
ReplyDeleteI love this idea thank you for sharing it I can't wait to make the felt flowers and create a headband w/ ALL the different flowers!! My daughters are going to flip!! :)
ReplyDeleteSuch a good tutorial!!! Thank You!!!!
ReplyDeleteThanks- I'm going to try these with clay- Make slabs, thin and smooth slabs..... Should be fabulous!!
ReplyDeleteThank you thank you thank you! Love your tutorial. :)
ReplyDeleteLove this tutorial! Thank you so much!
ReplyDeleteWow! Thank you so much for your tutorial! You broke it down into such easy steps. Thank you!!
ReplyDeleteThank you Katie! I have just finished four rolled flowers, with and without petals :), with the help of your tutorial.
ReplyDeleteThis will be PERFECT for my birthday party, which will be out of town and on a budget. I'll make up a bagful and fluff them when I get there! :-D
ReplyDeleteSo cool!!!!!!!!!!!!!!
ReplyDeleteI love your blog and tutorials and posted these on Craft Gossip Felting :)
ReplyDeletehttp://felting.craftgossip.com/2012/08/27/3-felt-fun-flower-tutorials/#
Linda
Thank you for this tutorial. God bless you for sharing.
ReplyDeletesimply fuuntastic!thanks.
ReplyDeleteI made flowers like this using my cuttlebug (dye cut) machin. Or is you want to invest in other machins joanns has ones for quilters and ones made by Friskys. That way your not cutting. It does take some practices. I would say find someone who owns a dye cutting machin and try it out before you buy one there's different kinds out there. my mom and I share the cuttlebug, and the dye cuts, we each have our own cricut but we share the Cartiges , it's worth the money if you find others who have this kind of stuff and you can share. Make sure you have you have your name on everything.
ReplyDeleteThis is so great. My teen daughter needs to earn money for her dance clinic and these are something she could do. Thanks for sharing!
ReplyDeleteP>S> I found you through fabric.com
ReplyDeleteI am speechless... beautiful!!
ReplyDeleteThese are really beautiful. I'm going to have a go at making a few of them if I can. Thank you for sharing.
ReplyDeleteThis is a great tutorial katie! love that you you have pictures for every step.. makes it all so much easier :) thank you so much for sharing :)
ReplyDeleteGreat ideas and tutorials! I just made the two versions of the spiral rose (with and without petals). Beautiful!
ReplyDeleteBeautiful crafts, excellent tutorials. Thank you. PatriciaM
ReplyDeleteGreat !!..Easy when you know how..Thanks for sharing... Elaine, North Wales, UK..
ReplyDeleteThanks a lot for sharing! This is really helpful! :)
ReplyDeleteI love this! I've been looking for a felt flowers tutorial and this is PERFECT. Thanks so much for sharing!
ReplyDeletethanks for sharing.. i very excited to try it=>
ReplyDeleteHeads up that your photos have been stolen and posted at http://www.joybx.com/entry/17529.html. Thank you for the tutorial!
ReplyDeleteHi! from Australia, iv'e always enjoyed making baby shoes in felt, but i love your ideas with flowers, so this nana will be doing these flowers. lol,
ReplyDeleteFantastic tutorial. Thank you very much!!
ReplyDeletethank you
ReplyDeleteThank you so much for this tutorial. It is utterly simple for beginners to craft work like me!
ReplyDeleteKeep it up :)
Oh bookmarking this!
ReplyDeleteما تهتم به شركة كشف تسربات المياه بالرياض هو البحث عن كيفة علاج مشاكل تسريبات المياه التي تطرأ علي المكان فجأة بواسطة اجهزة الكشف الحدية التي تستخدمها شركة كشف تسربات بالرياض والتي تسعي للوصول الي افضل النتائج المثالية القادرة علي حل هذه المشكلة بدون تدمير فالاعتماد علي الاساليب الحديثة يساعدكم في الحصول علي نتيجة مثالية في مصلحة العميل فنحن لا نكتفي بتقديم هذه الاعمال في مدينة الرياض فقط بلا لدينا الفنين المتميزة الذي يقدمون شركة كشف تسربات المياه بالدمام التي تعمل علي حل مشكلة البيت بدون الاعتماد علي ا اساليب تقليدية التي تستخدما بعض مقدمي خدمة شركة كشف تسربات بالدمام فلا تتكايل بشأن هذا العمل بالذات لانه يحل لك الكثير من المشاكل
ReplyDeletenike shoes for women
ReplyDeletepolo ralph lauren
canada goose uk
colts jerseys
broncos jerseys
giants jersey
ralph lauren uk
ralph lauren outlet
ed hardy uk
bears jerseys
yeezy boost
ReplyDeletesupreme clothing
michael kors outlet
curry 5
nike air max 2019
fake rolex
nike air max 95
cheap jordans
michael kors handbags
curry 4
nike air max
ReplyDeletenike air max shoes
kobe shoes
jordan shoes
kyrie 6
jordan 4
golden goose
off white nike
converse
adidas nmd
useful referencesee here this contact formGet More Info click sitewhy not try these out
ReplyDeletereplica bags from turkey replica bags in gaffar market replica bags koh samui
ReplyDelete