

I normally do not post on Sundays but after I completed my little weekend project, I just had to share it!
Sliced Wood Wall Art:
 Materials needed:
- Branches from outside (free!)
- Sticky Tack ($3.27 Walmart)
- Pencil
- Projector
- Miter saw or hand saw (recommend miter)
This entire project cost me under $4.00!

Making your Sliced Wood Wall Art:
1. Collect branches from outside.
Hint: The smaller the diameter of your branch, the more intricate text you can trace on your wall. The largest branch I used is about the size of a nickel.
2. Using a miter saw or hand saw, cut your branches into thin pieces replicating the width of coins. (I must give a shout out to my super sexy husband who cut me every single piece on his miter saw.)
Hint: They do not all have to be the same width, it adds extra texture when each piece is slightly different.
3. After your pieces are cut, organize into three piles: Small, Medium, and Large.
Hint: This step will help you when it comes time to tracing your text with the wood slices.
4. Allow wood slices to dry in the sun for a few days.

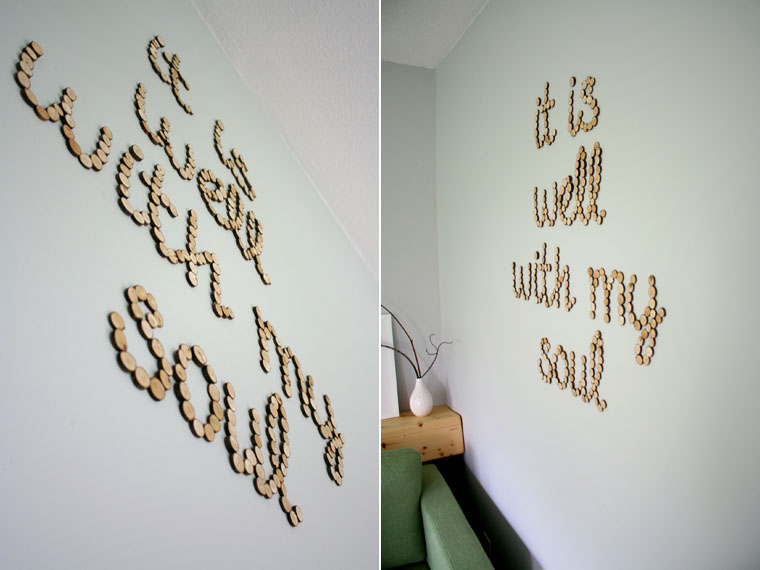
5. Using your projector, display your image onto your wall.
Hint: Choose your desired font and words and arrange how you like it in Microsoft Word. This will be the image you project onto your wall. Feel free to use a tape measure to center it onto your wall.


6. Lightly trace the text using your pencil.


7. Attach sticky tack to your sliced wood pieces.
8. Using your smallest pieces first, attach to wall at the tips of your letters as well as the overlapping sections (depending on what font you chose).

9. Continue attaching your sliced wood pieces onto your traced text until you are both happy and finished!
I am thrilled with my final result and the simple fact it is exactly how I pictured it to look :)


This weekend has been cloudy and rainy so this indoor project came at the perfect time! Some of the photos appear darker than others due to the changing weather outside. I was tempted to use flash but I resisted knowing natural light is always better--slowly learning more about photography.
Thanks again to my amazing hubs for slicing the wood, letting me borrow his projector from work, and assisting me in setting up :)
Happy Living--Happy Crafting
and remember
--Little Things Bring Smiles--up
This is ADORABLE! Seriously, I love it!
ReplyDeleteVERY cool idea katie!
ReplyDeletefun!
ReplyDelete<3
This looks SO good!
ReplyDeleteWhat a fun idea! Definitely darling and I love the quote :)
ReplyDeleteI love love love love love this!
ReplyDeleteLove, love, love THIS!!! And I'm Pinning it as a reminder to do something like this in our house!
ReplyDeleteWOW! You are so stinking creative! LOVE IT!! & it looks perfect in your home.
ReplyDeleteWow, this looks so great. It's Nathan's favorite hymn, too. Maybe I could do something similar for his office...Thanks for the inspiration, Katie!
ReplyDeletefantastic idea, Katie - so cute, love the effect, perfect words. i LOVE it : )
ReplyDeleteIt's a great idea and turned out really well!
ReplyDeleteWhat a great idea! Great hymn choice too!
ReplyDeletehttp://dixie-n-dottie.blogspot.com/
that is FABULOUS! i love that saying and i love the treatment- so unique and thrifty and natural- see so many things i love about it!
ReplyDeleteI love it♥
ReplyDeleteGorgeous, fabulous, inspiring. BIG SMILE!!!
ReplyDeleteGreat tutorial and a great project. It looks amazing!
ReplyDeleteWhat a GREAT idea! It looks amazing in your room!
ReplyDeleteWhat a beautifully organic idea. I love the natural element...and your saying is just perfect. This wouldn't be necessarily easy for me, but if you have any super simple projects or tips you'd like to share I'm hosting a link party today with a few fellow bloggers. I'd be great to see you linked up. :)
ReplyDeletehttp://thespacebetweenblog.wordpress.com/2012/03/27/diy-spring-wreath-painted-with-seaglass-and-driftwood/
Karah
Thank you so much for linking up. :)
DeleteWhat a cool idea Katie...love it ...xo
ReplyDeleteP.s
Hang in there...xo
i love this!! and that's one of my favorite hymns!
ReplyDeleteLove the texture - it adds so much to the wall! Great tutorial too. So glad you joined our Cinch party!
ReplyDeleteKelly
Looks great, Katie! I love that hymn, as well. :)
ReplyDeleteWhat an awesome idea! A quote with wood pieces! I need to make this...thanks so much for the inspiration!
ReplyDeleteThanks for linking up to the party :)
blessings,
karianne
PS I love this hymn so much!
I really love this idea ... so I pinned it! So amazing.
ReplyDeleteThanks for linking it up at our party!
:)
Linda
www.itallstartedwithpaint.com
That is super cute!
ReplyDeleteWhat neat idea! You have a great blog and I am excited to by your new follower. I can't wait to see what you share next. I would like to invite you to check out my blog http://www.arosiesweethome.com/ I have a Sunday link party you can come share anything you like.
ReplyDeleteHope to you stop by and say hi,
Rose
This is such a neat idea! I think you've started something here. Such a wonderful piece of art!
ReplyDeleteThis looks so awesome!! Nice work!
ReplyDeleteThis is so cool. And practically free! I think it gives your wall so much character in an unexpected way! I will have to try this soon!
ReplyDeleteI would love for you to come link up at my Thrifty Under {$50} Friday party!! Hope to see you soon!
Your newest follower,
Rachel
Wow
ReplyDeleteGreat idea :)
LOVE it! Super creative and that is one of my favorite hymns. Visiting from Funky Junk, SNS.
ReplyDeleteFeel free to share this at Knick of Time Tuesday!
Blessings,
Angie @ Knick of Time
I featured this today! it's fantastic! http://www.kimboscrafts.blogspot.com/2012/04/shout-outs.html
ReplyDeleteThis is adorable-what a creative idea-love the quote too!!I'm your newest follower-stop on by for a visit!
ReplyDeleteI love it and will be out looking for good branches later. Although when I first saw this I thought it was pennies. Considering I would only be writing goodnight I may see how that would work out. Especially since I did cover a table top with pennies for in there it would look good.
ReplyDeleteAbsolutely love the look and the word choice! Nice work!
ReplyDeletethis is super cool! i love it!
ReplyDeleteThis came out really neat! I kind of want to try it with corks!
ReplyDeleteWhat a great idea! I would love for you to share this with my "Unveil Your Genius" Link party (new linky every Thursday). http://taylornorris.blogspot.com/2012/03/unveil-your-genius-link-party-3-geniuss.html
ReplyDeletehappy Tuesday!
Fabulous idea! What font did you use?
ReplyDeleteI live in an apartment and I want to do this on a huge canvas! I love it!
ReplyDeleteóóóóó ezt én is ki fogom próbálni :))
ReplyDeletenagyon jó ötlet!!
So cool! I aboslutely LOVE this!! Pinned for future inspiration....
ReplyDeleteJenn :)
Love it!
ReplyDeleteSo nice, thank you !!!
ReplyDeleteI love this! I remember this from forever ago and finally found your blog again! Just followed you on google plus. I'm featuring this wall on my blog www.wethreemothers.blogspot.com for something that could be done perhaps with cork even. I hope that is okay? Thank you!
ReplyDeleteA mates bed provides plenty of storage space to open up a room, create safety and security, and are the perfect size for children. These small beds accommodate any room and any style.
ReplyDeleteThe first several months of my site there were no comments; just give it time; now they come in like crazy every day! Thanks.
ReplyDeleteStanley J. Jacobs
It is a nice post.
ReplyDeletegoogle.com
I love woodwooking art.Thanks for sharing this wonderful post. You took something that wasn't very you and totally made it work in your home. It's seems like a great blog i have ever seen.
ReplyDeleteThat's a really good idea for decorating the house with Sliced Wood. It's simple and interesting.
ReplyDeleteThis is such a neat idea! A quote with wood pieces! i love it!
ReplyDeleteI liked wood art. You really gave me a great idea, I think I will create beautiful products and I will send them to you.
ReplyDeleteCases of attractive items are furniture, floor coverings, drapes, accessories, and other accessories. All of these items obviously need to enhance each other. i just love everything you do, it's all just so quirky and makes me smile! so glad you shared :)
ReplyDeleteI love this! I will make it for my house. Thanks for sharing.
ReplyDeleteNice tutorial. Bookmark this blog
ReplyDeleteNow I know what to do with the big white space in our living area - thanks so much for this! Where did you buy sliced wood for this, by the way?
ReplyDeleteGreat idea, great art ! Amazing job ! Thanks for sharing this !
ReplyDeletemichael kors outlet online
ReplyDeletecheap jordans
coach outlet
true religion jeans
ferragamo shoes
sac louis vuitton pas cher
oakley sunglasses
ray ban sunglasses
louis vuitton bags
nike outlet online
air max 90
babyliss pro
nike air max
true religion jeans
michael kors handbags clearance
jordan 4
uggs outlet
adidas shoes
michael kors outlet
true religion jeans
rolex outlet
michael kors outlet clearance
polo shirts
michael kors outlet
soccer jerseys
longchamp pas cher
coach outlet clearance
michael kors outlet
gucci outlet
nike tn pas cher
bottega veneta outlet online
christian louboutin shoes
ugg outlet
coach outlet clearance
ferragamo outlet
0727jianxiang
polo ralph lauren outlet
ReplyDeletenike roshe run
cheap jordan shoes
cheap uggs
louis vuitton outlet online
christian louboutin shoes
louis vuitton outlet online
true religion outlet online
michael kors handbags outlet
air max 90 black
nike air max
coach factory outlet online
canada goose sale
coach outlet online
uggs outlet
michael kors purses
uggs
jimmy choo shoes
michael kors outlet clearance
authentic louis vuitton handbags
nike store uk
true religion sale
longchamp handbags
louis vuitton borse
cheap jordans
adidas trainers
nike cortez white
bottega veneta
michael kors handbags
pandora charms outlet
ugg boots canada
reebok
201691yuanyuan
woo. great ideas.
ReplyDeleteGreat post and idea! Keep it up
ReplyDeleteThis comment has been removed by the author.
ReplyDeleteWow! Excellent post. Continue and share with us.
ReplyDeleteDear Katie , I’ve no doubts you’ve done some research while writing on Sliced Wood Wall Art. I would expect more of this in your next write-ups, so I could get help from your information to create some content for our followers and the website- Sandersreview.
ReplyDelete