The blog has been rather quiet this month because Adam and I actually completed a few house projects! Crossing items off our forever to-do list is seriously the greatest.feeling.ever. Well..I'm sure getting a new job, buying a house, getting married, or having a baby is better cause for that term but hey--at our stage of life, completed house projects are reason enough!
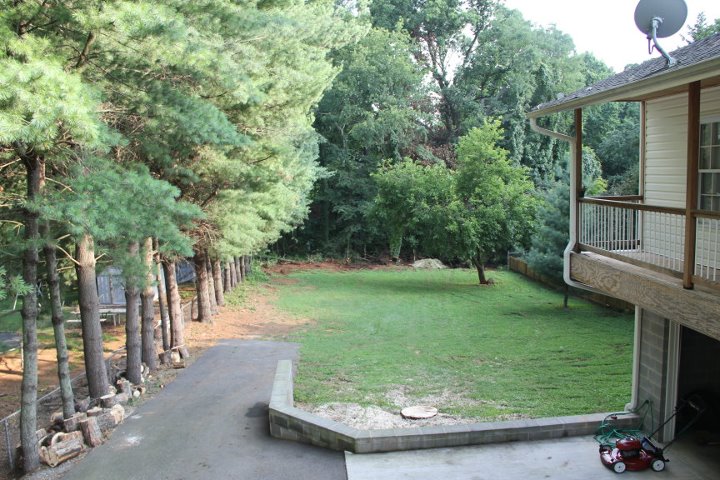
Adam and I tackled a big project the other day, I'll let you guess by looking at this image:
 Any ugliness jump out at you?
Oh..you noticed some uneven clay stained cinder blocks?--Funny, we saw that too!
The good news for us, that ugly cinder block is now gone :) I'm going to share the process of how we painted it to simply inform those of you who are new to this 'home owner thing' like us and have ugly cinder block around so we can all learn together.
Materials needed:
 Getting Started:


 We adore the color Cathedral Gray. At night it is a rich gray and during the day with the sun light reflecting off of our fence and deck, it has a nice warmth to it--almost beige like.
It's perfect!
(linking up to a few parties)
Adam and I tackled a big project the other day, I'll let you guess by looking at this image:
Oh..you noticed some uneven clay stained cinder blocks?--Funny, we saw that too!
The good news for us, that ugly cinder block is now gone :) I'm going to share the process of how we painted it to simply inform those of you who are new to this 'home owner thing' like us and have ugly cinder block around so we can all learn together.
Materials needed:
- Pressure washer (If you do not own one, ask family and friends)
- BEHR Premium Plus Ultra Exterior Flat ( We used: Cathedral Gray)
- Scotch Blue Painters Tape
- Paint rollers of your choice (We purchased the biggest/fluffiest roller from Home Depot made for
extremely rough/coarse surfaces and it did not work as well as the cheap smaller roller you would use
for an interior. We found the smaller one filled in the tiny holes better in the cinder blocks despite the
larger one being designed for that very thing. Strange but true!)
- Paint sticks to stir
- Paint trays to roll
- Paint holder for cutting in and for rolling
- Small brush to cut in primer and paint
- Pocket knife/kitchen knife/ or razor blade (I used a sharp little kitchen knife)
- Drop cloths/old sheets/lawn tarps (In our case we used all three!)
(Buy gallons of paint/primer according to the size of your project, not by the links I have shared)
1. Before beginning any painting, there is prep work to be done. First prepare the outside area by
blowing or sweeping loose debris on the ground.
2. Using your pressure washer, clean the existing cinder blocks to remove all dirt and mildew. Allow
to dry completely.
Tip: Depending on the condition of your cinder block, you may
have to scrape off old chipping paint or use chemical solutions
along with your power washer to remove excess mold and
mildew.
3. Tape along the bottom of your cinder block wall and the ground using Blue Painter's Tape.
Tip: I recommend using a dish towel or old t-shirt to help
reinforce the seal of the tape to the ground. It will not be perfect
since you are working with bumpy surfaces but do your very
best and take your time.
reinforce the seal of the tape to the ground. It will not be perfect
since you are working with bumpy surfaces but do your very
best and take your time.
4. Lay a drop cloth down to protect the ground/pavement/concrete.
5. Using your small brush, begin cutting in with the primer.
Tip: For your first coat of primer during cutting in, do not apply
too heavy or paint will "glop" and may sink under the tape. Do
two thin coats of primer for your cutting in and then later on you
can apply a heavier/thicker coat of your actual paint because the
primer will act as a sealer and not allow any paint to drip under
tape.
6. Begin rolling your primer onto the cinder blocks.
Tip: Like I mentioned earlier, we preferred using the smaller
roller instead of the thicker one designed for painting rough
surfaces. We felt the smaller one filled in more of the tiny holes
in the cinder block. Please use whatever you like best and works
well for you.
(I had to include this photo because it made me laugh out loud. This is my face saying to Adam, "Make sure you are only getting the roller and not me!" Bah, he is such a stinker. Enjoy friends!)
7. After completing your first coat of primer, allow walls to dry.
Tip: Wait for at least an hour if you are using KILZ and if it is
a different brand wait longer and do as the label suggests. We
played it extra safe and let it fully dry over night. Apply a
second coat if needed. We bought paint and primer in one so we
opted not to do a second coat.
8. Repeat steps 5-7 using your paint.
(Notice in the photo above I already cut in along the bottom and in any of the corner/creases before Adam rolled on the first coat of paint.)
9. When the first coat is complete, inspect the job and coverage. Use your small brush from cutting in
to fill in any white primer holes bleeding through that were missed.
Tip: Apply a generous amount of paint onto your brush and
"smush/poke/dab" your brush into the holes. Your brush will
look like it's dancing with a full twirl included :)
10. Once paint has dried, apply second coat.
Tip: Remember to cut in with your second coat before rolling.
11. Using your small razor blade or kitchen knife, score a line between your tape and cinder block
wall. This will guarantee the paint does not peel off with the tape. Remove your tape.
Tip: Remove tape on an angle and at a consistent speed.
12. Clean up your painting area and brushes/rollers.
13. Enjoy your hard work!
I adore the picture above because you can see the ugly cinder block in the background plus a little pup's bottom. Great reminder why DIY-ing is worth it! And now you know our next project for this weekend. Oh--in case you were wondering, Colden approves ;)
Ugly cinder block in background and pretty painted cinder block in foreground!
It's perfect!
(linking up to a few parties)
Happy Living--Happy Priming and Painting
and remember
--Little Things Bring Smiles--