

11.30.2010
.Just Me.
It is raining outside. The sky is dark, the temperature is brisk, and I am warm in my house. On days like today, I listen to the rain as it hits my front window and hear the mighty rush of the wind as it weaves between the trees in my yard. I am happy inside. Rainy days I sit and think..I am relaxed. My head is full of thoughts..deep, analytical thoughts, meaningless thoughts, spontaneous thoughts, depressing thoughts, frightening thoughts, joyous thoughts..so many thoughts. I need to do this on the sunny days too, that is, do nothing--just sit and think. Rainy days bring me to a different place, a happy place, a "Just Me" place. I LOVE the rain and am thankful for the peace it brings me.
11.29.2010
.You're Invited.
Homemade Invitations

It was relaxing making these invitations and they cost $17.00. $13.00 were spent on clear labels, something I was not planning on using. I wanted to handwrite the information on each card but when it came down to it, I was not digging the way it looked so I came up with a new plan (use clear labels!) The cardboard was FREE--when I was at Michaels, the Scrapbooking papers were divided by these cardboard cut outs and I thought..hmm..how perfect! The lovely sales associate told me to help myself since they would only be thrown out, so I did! I bought the berries and rafia for about $4.00 total. I used more Scrapbooking paper I had in the"craft corner" of our spare bedroom.
My suggestion--decide ahead of time if you want to handwrite the information or print out the text onto the actual invite and stick to your original plan :)
I did not have the option of printing since I changed my original plan after the invitations were constructed entirely, berries and all! (It would have saved me $13.00..oh well, lesson learned!) I am still very happy with how they came out and I hope these pictures do them justice!
Enjoy these images:

 |
| Second page of the invitation which shared the directions |
 |
| Final package minus the envelope |
11.28.2010
.Thanksgiving.
This is a little late but here it goes:
H A P P Y T H A N K S G I V I N G !
I hope everyone had a wonderful Thanksgiving with loved ones. I would like to share with you what God has blessed me with and what I am ever so thankful for, my FAMILY. I am truly taken back this year by all the love in my life. I feel very fortunate to have such a large family and for marrying into the Miller family.
A couple of weeks ago, Adam and I drove up to New Jersey to celebrate my aunt and uncle's 50th wedding anniversary. It was a joyous occasion filled with--you guessed it, LOVE! The party was fabulous and the whole Morrow clan made it including all the new babies. God is blessing the Morrow family more and more with the births of so many little miracles. It was touching watching each member of the family meet and greet the new bundles with big smiles and open arms and watching my big brother be a daddy--something that still brings tears to my eyes! Our time in New Jersey was short but sweet and made Adam and I realize how lucky we are to be loved by so many.
Thanksgiving week was spent visiting the Miller and Williams family in c o l d Minnesota. We started the week with a baby shower for my sweet sister-in-law and once again--LOVE filled the room! The timing could not have been more perfect to celebrate a new life and to give thanks to God for the new family. Thanksgiving and Christmas (yes, it came early this year) were celebrated with all of Adam's siblings and their families. It was an absolute blast having everyone together and spending time with our nieces and new baby nephew! God is also blessing Adam's side of the family with new little ones and we are all thankful for our growing family. Our time in Minnesota was fast but full and many more memories were made! Thank you to our lovely hosts throughout the week, we appreciated all you did for us.
I AM THANKFUL FOR MY FAMILY.
My family is incredibly important to me and I am thankful for every moment I have with them. God continues to amaze me with the love I receive and the love I can share with others.
So my dear readers, its your turn:
What are you thankful for this year?
11.24.2010
.Homemade Bunting.
Hello everyone! Thank you again for reading my blog, it means a lot to me. This has been extremely fun to keep up with and I think I found something new to add to my HOBBIES! (I think the hubs is proud!)
I have been extremely excited to share this post with you because it was easy to make and the end result is fantastic. For the last few months, I have been introduced to the word "bunting" and noticed these adorable fabric flag banners all over blogs and on Etsy.
As much as I have LOVED these..there was one problem..one, very big problem..I CANNOT SEW! The only thing I can honestly say I have successfully sewn (in my life sadly) was a pillow made with star and moon fabric back in the sixth grade. I decided not to give up and would think of a way to make my very own bunting.
Well, my friends, I did it.
The materials used for this DIY Bunting are listed:
-Twine
-Scissors
-Scrapbook cutter (not necessary, but very handy!)
-Scrapbooking paper
-Scrapbooking double sided adhesives (or double sided tape)
THAT'S IT!
I began gathering the different colors and patterns I liked. My inspiration was a Harvest/Fall theme because I used the bunting as decoration for my sister-in-law Maria's baby shower. (Pictures from the shower coming the week after Thanksgiving) I suggest thinking ahead of the color palette you would like before getting started..it makes the process easier. I used Scrapbooking paper I already had in my "craft corner" of my spare bedroom. You can find Scrapbooking paper at any craft store for as little as .25 cents a piece! Twine and Scrapbooking adhesives can also be found at any craft store for about $4-$6 depending on the store. Now then--let's begin with the tutorial!
Making Your Pattern
1. First step is to select your paper using a variety of colors and patterns to
ensure your bunting is visually stimulating.
2. Decide on the size for each triangle. (I began by cutting a piece of paper
to 4x6.)
3. When you have decided on your size for each triangle, fold the paper in
half and draw a line on the center fold. Next, draw an "X" on the top two
corners and the bottom on the center fold line.


Now the real fun begins once your pattern has been made.

 3. Using scissors, cut between the three triangles made on your Scrapbooking

 4. After cutting, you should end up with another symmetrical triangle that
unfolds in the middle showing two triangles connected at the center.


I have been extremely excited to share this post with you because it was easy to make and the end result is fantastic. For the last few months, I have been introduced to the word "bunting" and noticed these adorable fabric flag banners all over blogs and on Etsy.
As much as I have LOVED these..there was one problem..one, very big problem..I CANNOT SEW! The only thing I can honestly say I have successfully sewn (in my life sadly) was a pillow made with star and moon fabric back in the sixth grade. I decided not to give up and would think of a way to make my very own bunting.
Well, my friends, I did it.
 |
| Props to my pup Colden for being a good boy! |
The materials used for this DIY Bunting are listed:
-Twine
-Scissors
-Scrapbook cutter (not necessary, but very handy!)
-Scrapbooking paper
-Scrapbooking double sided adhesives (or double sided tape)
THAT'S IT!
I began gathering the different colors and patterns I liked. My inspiration was a Harvest/Fall theme because I used the bunting as decoration for my sister-in-law Maria's baby shower. (Pictures from the shower coming the week after Thanksgiving) I suggest thinking ahead of the color palette you would like before getting started..it makes the process easier. I used Scrapbooking paper I already had in my "craft corner" of my spare bedroom. You can find Scrapbooking paper at any craft store for as little as .25 cents a piece! Twine and Scrapbooking adhesives can also be found at any craft store for about $4-$6 depending on the store. Now then--let's begin with the tutorial!
Making Your Pattern
1. First step is to select your paper using a variety of colors and patterns to
ensure your bunting is visually stimulating.
2. Decide on the size for each triangle. (I began by cutting a piece of paper
to 4x6.)
3. When you have decided on your size for each triangle, fold the paper in
half and draw a line on the center fold. Next, draw an "X" on the top two
corners and the bottom on the center fold line.


4. Place the paper in the cutter and simply line up your "X" marks
to make straight diagonal lines. Make two cuts, one for each side until
you are left with a symmetrical triangle.
you are left with a symmetrical triangle.


Now the real fun begins once your pattern has been made.
Making Your Bunting (Flags)
1. Gather your Scrapbooking paper and pattern.
2. Next, fold the paper in half and trace your pattern three times with the
straight edge on the folded side.
Hint: Make sure you place the top of your pattern
on the folded side of your Scrapbooking
paper.
Hint: Make sure you place the top of your pattern
on the folded side of your Scrapbooking
paper.


paper. Continue to cut along the lines either with scissors or with your
Scrapbooking cutter to guarantee straight cuts.


unfolds in the middle showing two triangles connected at the center.


5. Unfold your flags and flip upside down. Grab your twine and place directly
on folded line, inside the crease.

6. Add your Scrapbooking double sided adhesives (or double sided tape)
under the twine, along all edges, and in the bottom point of your flag.
Once the adhesives are on, fold down your Scrapbooking paper and line up
all edges.
under the twine, along all edges, and in the bottom point of your flag.
Once the adhesives are on, fold down your Scrapbooking paper and line up
all edges.


7. Continue until you are pleased with the amount of flags. It is up to you
how close you want each flag from one another. (I did about 2.5-3 inches
between each one.)
8. SIT BACK AND ENJOY YOUR WORK!
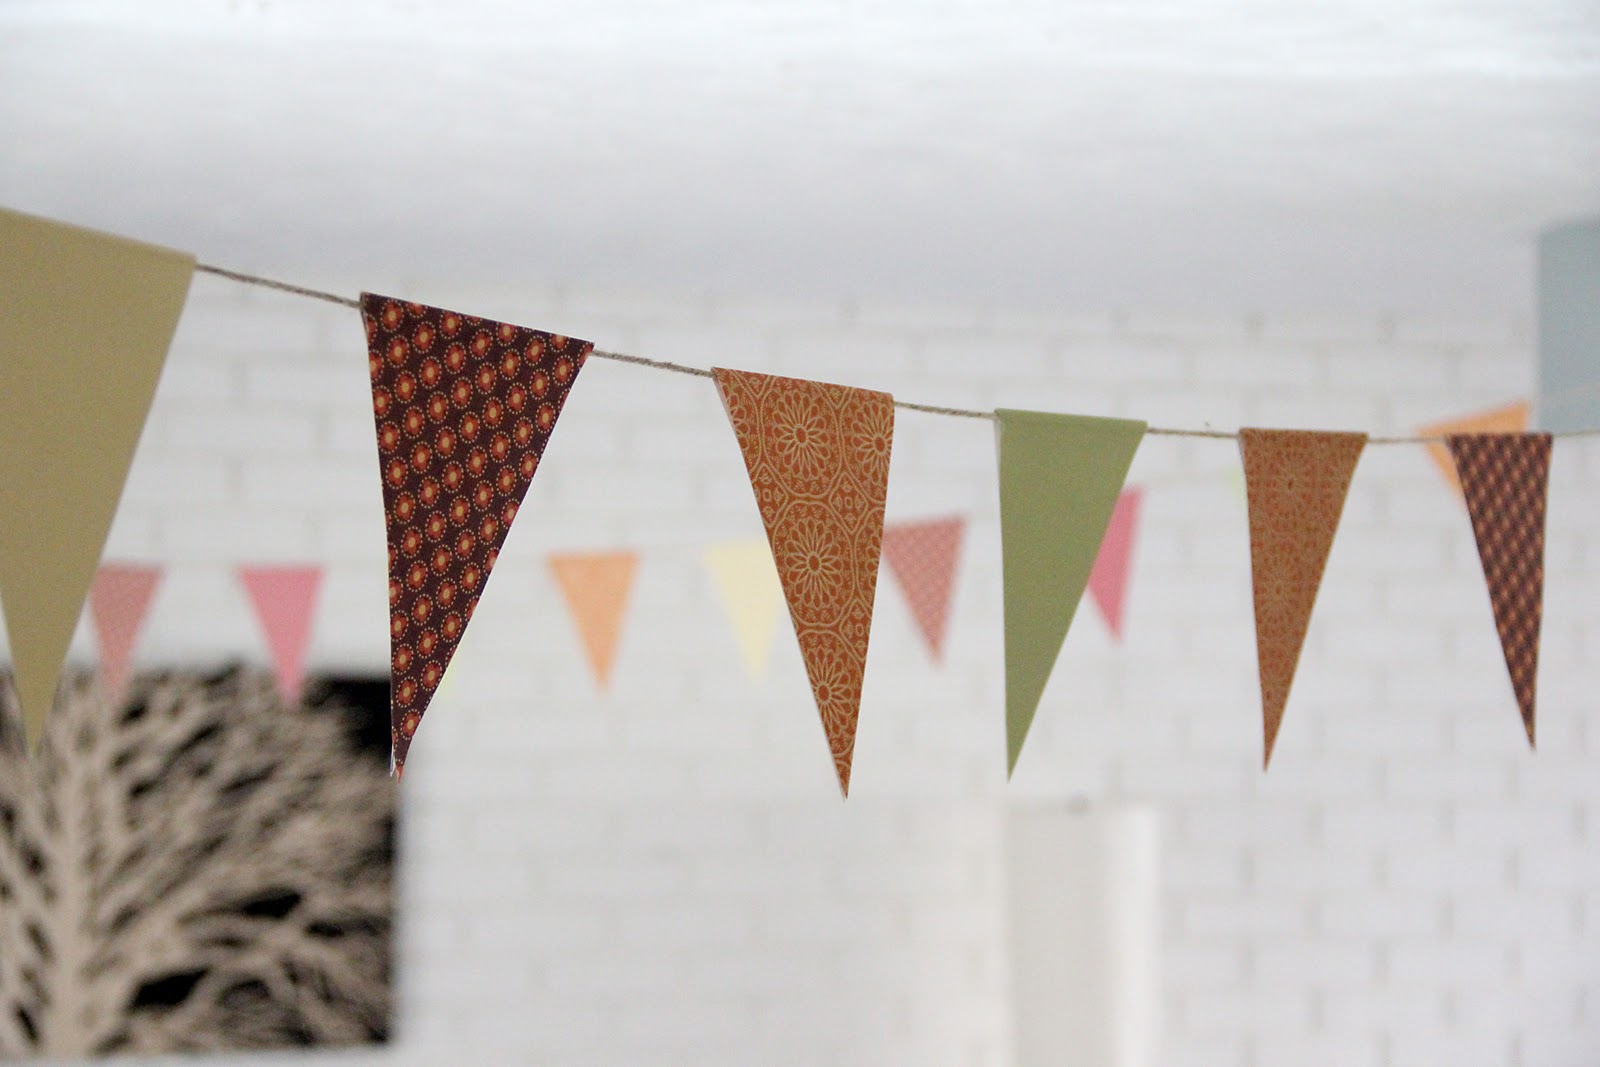


This Homemade Bunting was fun to make! If you cannot sew, no worries, I found a solution! Get creative with this technique and instead of twine, use ribbon, or yarn! Use felt letters (or letter stickers!) and hot glue them onto the Scrapbooking paper to write messages such as "Happy Birthday" or "Merry Christmas"--the sky is the limit! Bunting can be used as decoration for any Holiday and party. It is very rewarding seeing a project you thought of, executed with your own twist, come together to create beauty.
Now it's your turn to get busy and share your work!
11.23.2010
.Little Things Bring Smiles Part 1.
Life is funny when you realize what
little things bring smiles.
- The position in which my husband sleeps. Never fails, every morning, he is
the same way.
- Colden’s sleepy eyes.
- The morning sunlight shining in my front window.
- The smell of coffee in the morning…afternoon...evening...AND night.
- Rain..the smell..feel..sound.
- Colden’s "bum in the air excited to play" position.
- Clean, cold sheets.
- Notes I find in the house from my husband.
- Babies..any baby..makes my heart happy.
- Seeing my favorite colors all throughout my home.
- How my vacuum fits in the odd little spaces around the house.
- The smell of my house in New Jersey.
- Fires..feeling the warmth they bring.
- Smelling the smoke from the fire on your fleece the next morning.
- The way my husband holds me.
- How Colden rolls to his back every time I sit on the floor next to him just
waiting for a belly rub.
- My green umbrella.
- Clorox wipes..oh how I LOVE my Clorox wipes.
- Watching the same movies over and over again.
- When Adam asks me, “Oh..have I told you this story before?”
- My green umbrella.
- Clorox wipes..oh how I LOVE my Clorox wipes.
- Watching the same movies over and over again.
- When Adam asks me, “Oh..have I told you this story before?”
11.20.2010
.Acorn Wreath.
I know it's beginning to look a lot like Christmas-BUT-let us still enjoy the Fall Season!
This year, our front trees gave birth to what felt like thousands upon thousands of acorns. At first they caused much frustration but then I found this tutorial. I became ecstatic over the simplicity of this Acorn Wreath and had to try it for myself! My sweet sweet husband helped me gather the acorns and let me borrow his nice camera to document each step. I hope you enjoy this DIY craft project as much as I have.
Here is my final Acorn Wreath:

- Straw craft wreath ($2.50 at Michaels)
- Hot Glue Gun (WARNING: You use A LOT of hot glue!)
- Acorns (F R E E!)
- Spray Paint (Optional--$1.00 at Walmart)
- Ribbon (Optional--$1.00 at Dollar Tree)
Preparing Your Acorns
1. Rinse acorns well and be sure to check for any creepy crawlers who may
have tagged along to join the fun.


cover your cookie sheet with foil.)
3. Bake your acorns at 350 degrees for
15 minutes.This is the most important step because baking
the acorns will KILL any CREATURE who may be living inside. BAKE THEM
BAKE THEM BAKE THEM!
 |
| The acorns come out of the oven shining and smelling good!
4. Allow acorns to cool before you begin assembling your wreath.
|
Making Your Acorn Wreath
1. Remove plastic film from straw wreath. Decide on a starting location and
begin hot gluing your acorns. (I chose to do a diagonal line to create a
swirl..it worked in some places and others it did not..just have fun with
it, the design creates itself!)
 |
| After you have completed a few rows of acorns, your wreath will begin to look like this. |
wreath (except for the bottom of course)! It will take you a long time and
may even be a 2 or 3 day project but your time will be worth the end
result.


use spray paint in my favorite color green and pair it with brown ribbon to
match my living room and front door. Get creative--keep it natural and
hang with twine, spray paint it and add flowers/bows--it is up to you
friends! (If you chose to spray paint it then keep on reading)

4. Bring your wreath outside and set it on newspapers. To make painting it
easier, spray your wreath with PRIMER first. I did not and it took a long
time and many coats to cover the acorns.
5. When primer is dry, begin painting! Use fluent motions and hold about 6
inches away from wreath. Be patient and do many coats instead of one thick coat, the end result will be much better.
6. Once the paint is nice and dry, pick out a ribbon and hang up your work
with a smile :)

 |
 |
Thank you for reading :)
11.19.2010
.Rustic Elegance Part 4.
This is the final post for our DIY wedding crafts! I have really enjoyed thinking back to my wedding day and remembering all of the emotions I was feeling. God has blessed me with more than I deserve and I am truly grateful.
As the saying goes, "Save the best for Last!"--well, my friends, I did not do this. In fact, this is the project I was on the fence about sharing with you because it is nothing special..however, since you are currently reading this post, you know what decision I made :)
With the help of my dear friends, Caitlin and Lauren, we were able to make seating cards for EVERY guest at the wedding! It was a fun night filled with food (of course), movies, and a whole lot of laughter! Thank you girls for helping and being with me those few weeks before the wedding..I will never forget it!
The seating cards we made from Scrapbook paper and good ol' Scotch tape. The process was simple, especially when you had extra hands helping you! One person was in charge of cutting and folding, another writing, and the third taping.


That's all folks! Thank you for checking out our DIY wedding crafts, stay tuned for much much more..
.Rustic Elegance Part 3.
The DIY wedding crafts are starting to dwindle down..only a few more left to share! I hope you have enjoyed what you have seen so far and most importantly--
HAVE BEEN INSPIRED!
After the flower bouquets were completed, I turned my attention to the men! I continued to use the artificial flowers from Michaels and the left over ribbon and berries to make the boutonnieres for the groomsmen and of course--my groom! These were incredibly simple to make and I had them finished in no time (I'm sure it helped we had a small wedding party!) I started with the extra flowers I had leftover and kept the petals on their tiny stem bundle. I used one bundle, which consisted of 3 flowers, for each of the groomsmen. I then added one tiny piece of a branch and wrapped both with wire and then covered with ribbon--it was THAT EASY! We used one pin each to secure them onto the men.
For Adam's boutonniere, I used 2 bundles of flowers, more twigs, and added some green berries to match my bouquet. We had to make his a little different from the rest of the men... after all, he was the GROOM!

Here is a shot of all the men together--how STUDLY are they?!
The wedding day was rainy but we were able to step outside to snap some quick photos. Not sure if it was the lighting or setting on the camera, but you cannot really see the green color of the vests and ties. The pictures taken inside turned out better but what can I say--I still like this photo best!
Thank you for reading, only one more post to go on our DIY wedding crafts!
HAVE BEEN INSPIRED!
After the flower bouquets were completed, I turned my attention to the men! I continued to use the artificial flowers from Michaels and the left over ribbon and berries to make the boutonnieres for the groomsmen and of course--my groom! These were incredibly simple to make and I had them finished in no time (I'm sure it helped we had a small wedding party!) I started with the extra flowers I had leftover and kept the petals on their tiny stem bundle. I used one bundle, which consisted of 3 flowers, for each of the groomsmen. I then added one tiny piece of a branch and wrapped both with wire and then covered with ribbon--it was THAT EASY! We used one pin each to secure them onto the men.
 |
Very simple + Using the leftover scraps = S U C C E S S
|
For Adam's boutonniere, I used 2 bundles of flowers, more twigs, and added some green berries to match my bouquet. We had to make his a little different from the rest of the men... after all, he was the GROOM!

 |
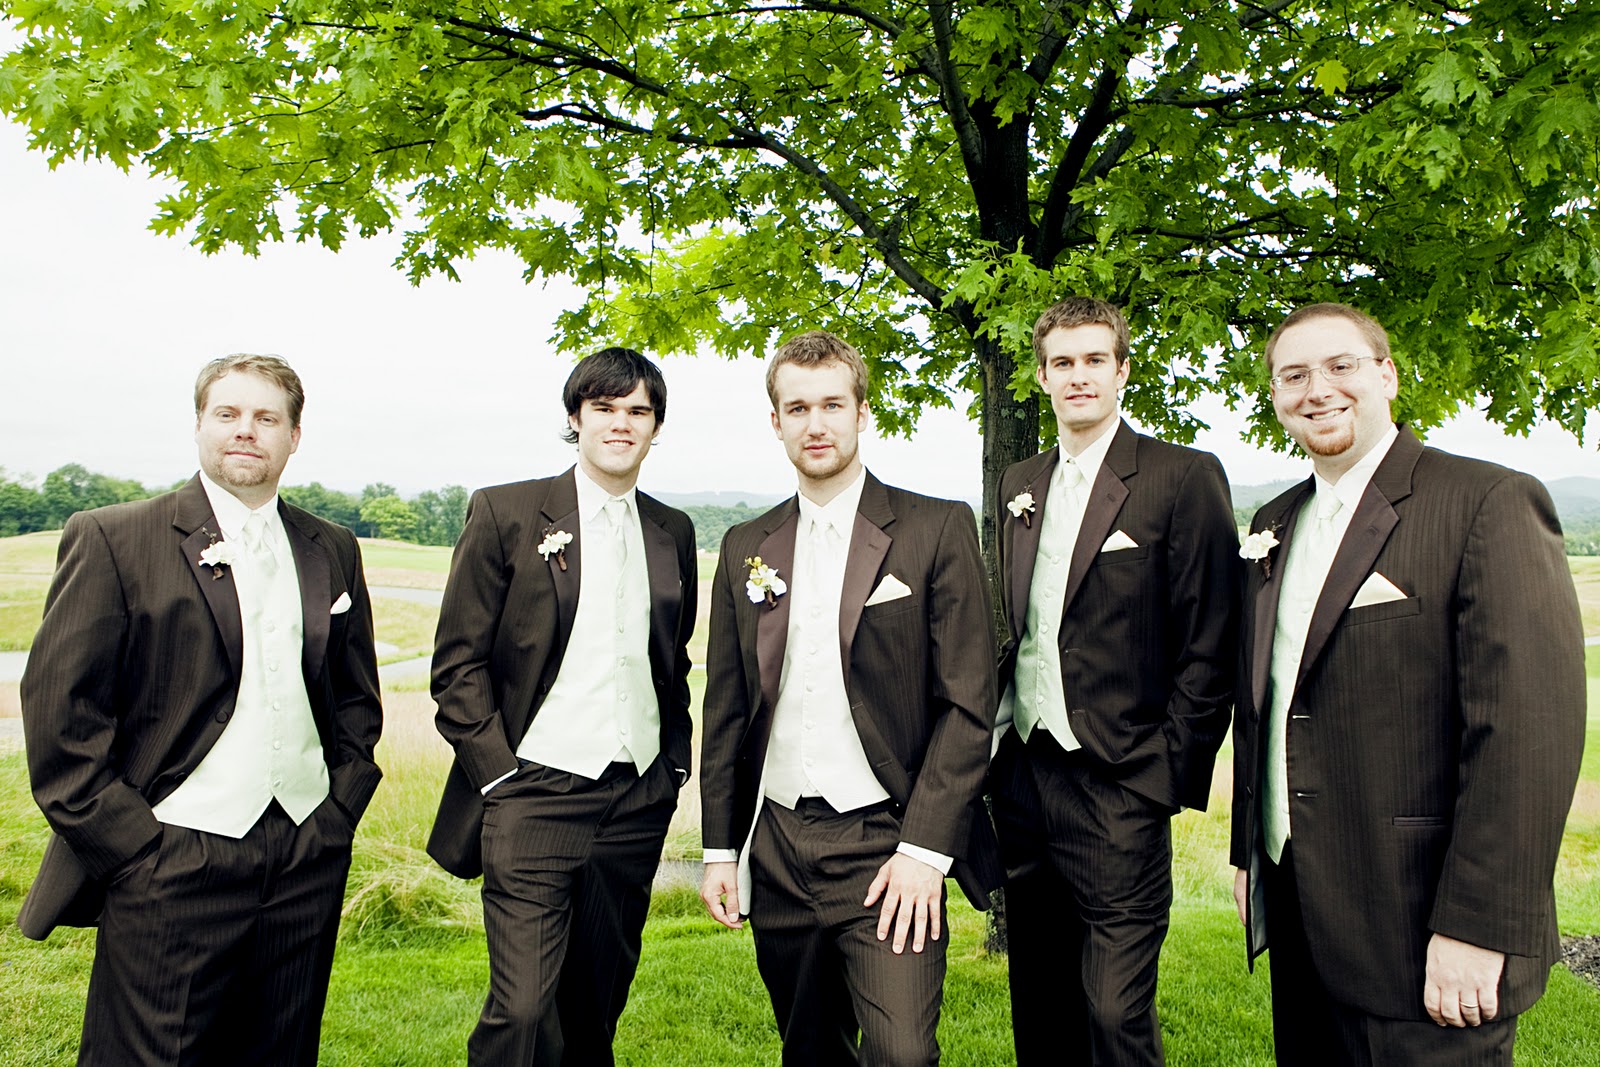 |
| Left to Right: Brother-in-law Brett, Brother-in-law Alex, Husband Adam, Brother-in-law Nathan, Brother Scott |
Thank you for reading, only one more post to go on our DIY wedding crafts!
11.18.2010
.Rustic Elegance Part 2.
I think today is a fabulous day to show you more of my DIY wedding crafts. Last time we took a look (-say that line fast) at the centerpieces and table numbers. Today we will focus on the flower bouquets. I had a great time making these artificial flowers come to life to create a rustic elegance with real twigs, ribbon, and berries!
For the bridesmaid bouquets, I used light green Hydrangeas which matched the green in the groomsmen vests and ties just perfectly! I added white Hydrangeas with the green ones in the maid of honor's bouquet to make her stand out from the rest--it was subtle but pretty.
For the bridesmaid bouquets, I used light green Hydrangeas which matched the green in the groomsmen vests and ties just perfectly! I added white Hydrangeas with the green ones in the maid of honor's bouquet to make her stand out from the rest--it was subtle but pretty.
 |
| Silk flowers and ribbon from Michaels. |
Once my flowers were arranged and the bouquet secured with wire, I then cut the stems short--about 4 inches in length. I used the stems from the artificial flowers as my guide for adding the twigs. I cut the twigs all the same length--6 inches to cover the stems--using pruning shears and laid them side to side on a table. Once the twigs were perfectly lined up in a row very tightly packed next to each other, I took my hot glue gun and made 4 long horizontal lines of glue across the entire row of twigs. This held the twigs together and made it easy to wrap around the stems of the flowers. When the twigs were wrapped around the stems, I secured them using wire. When the wire was in place the only thing missing was the pretty ribbon to cover it! I wrapped the ribbon around-and-around-and-around until I was satisfied and used two pins to hold it all together. The end result looked great and I was one happy bride :)
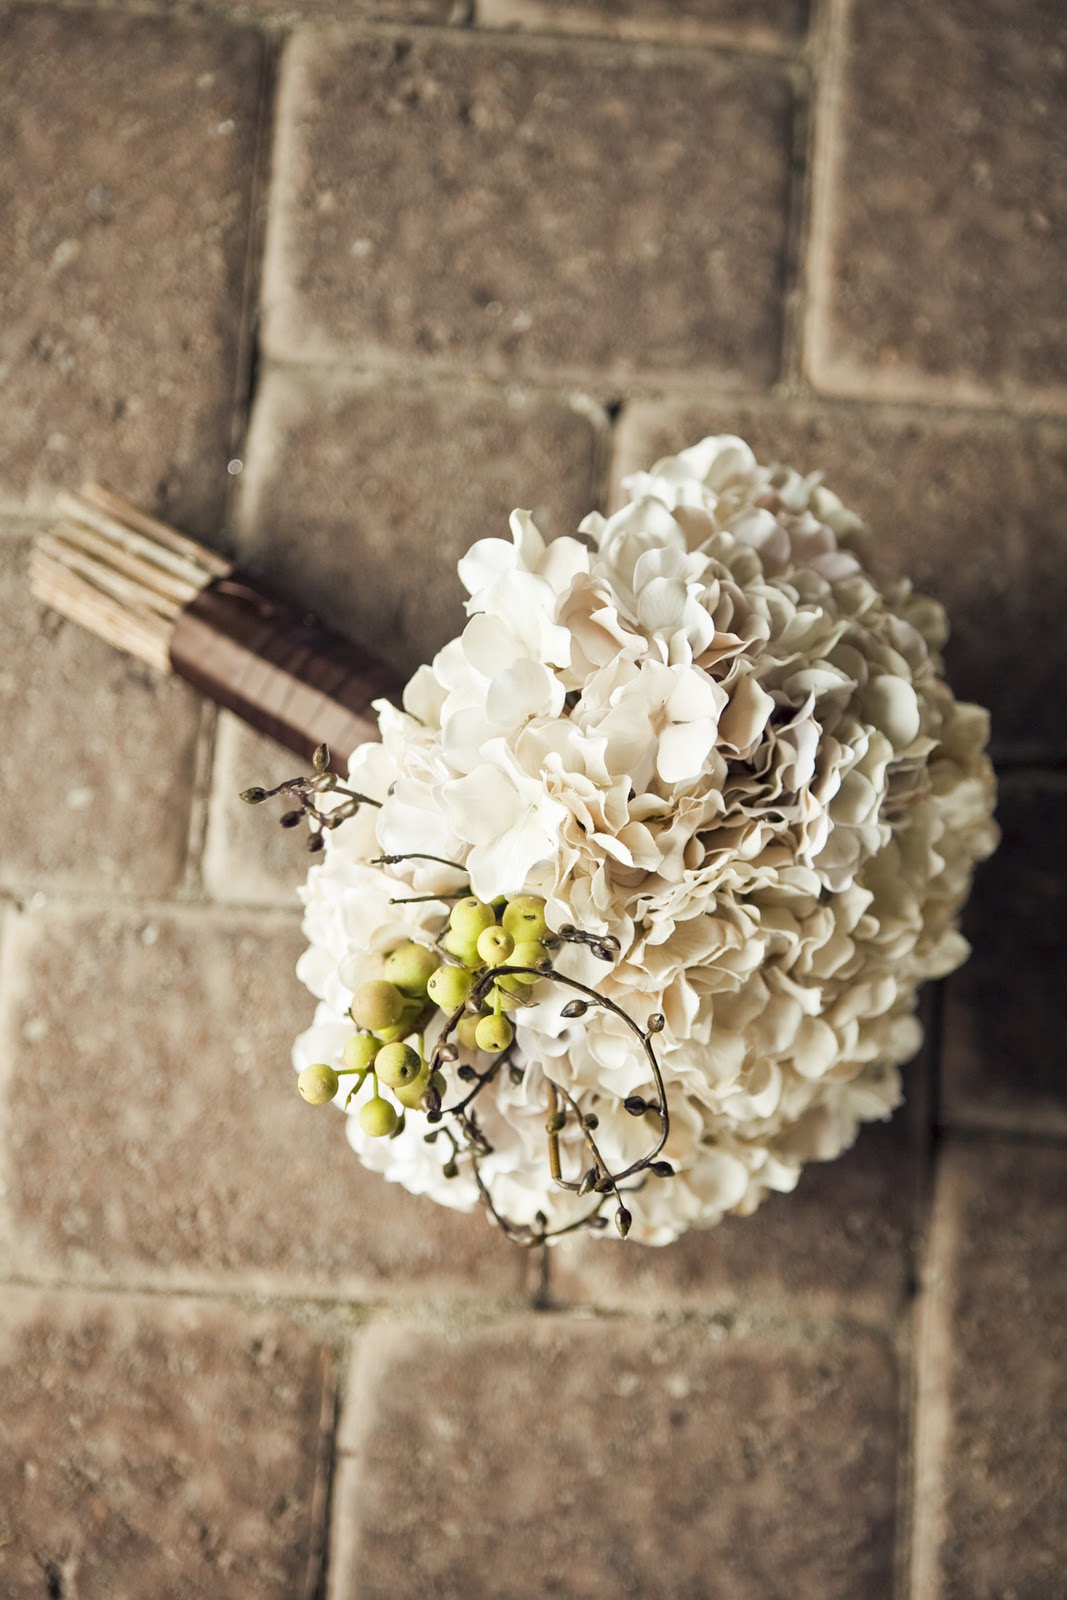 |
| Bridal Bouquet. |
I used the same technique to make my bouquet. I used off white, almost light tan, Hydrangeas because I chose to have an ivory dress. Adam was wearing a brown tux with an ivory vest and tie. I included the green berries in my bouquet and in Adam's boutonniere which I will share with you in a later post.
 |
| I LOVE this shot. |
Here is a picture of all the ladies. Adam and I were blessed to have our family members share our day with us.
Be on the look out for Part 3 coming soon! Thank you to John Rozier for capturing these beautiful images.
 |
| Left to Right: Sister-in-law Naomi, Sister-in-law Maria, Me, Cousin Jessica, Sister-in-law Kim |
Be on the look out for Part 3 coming soon! Thank you to John Rozier for capturing these beautiful images.
Subscribe to:
Posts (Atom)